Showing posts with label backgrounds. Show all posts

Wednesday, November 16, 2016

Groovy Tie-Dye Card

Hello! I wanted to pop on here quick and share some of the fun NEW Sheena Douglass Groovin' 60's goodies with you. Crafter's Companion just released this brand new collection, and I think it's absolutely GROOVY! Four stamp sets and seven stencils that are sure to bring you peace, love and creativity. Shop for these new products HERE.

I've got a fun tutorial over on the Crafter's Companion Blog - Create a Tie-Dye Silhouette Card.
 

Imagine all the fun colors you can mix up for the most FAB tie-dye background panels!


Go check out the tutorial for complete details and instructions on making this project.


Stamp sets: Just Truckin' and RPM
Stencil: Tie Dye


Peace out!

Check out the Crafter's Companion USA Sheena Douglass Groovin' 60's Pinterest board for more ideas and inspiration.

Sunday, June 5, 2016

Live like there's no tomorrow

Hi everyone. Here's a super easy CAS card I designed Spectrum Noir Sparkle Pens and stamps from Crafter's Companion.


The stamp image is from the Sheena A Little Bit Scenic - Silhouette Highlands set. I used this set on my June calendar page that I shared on my blog yesterday, HERE.


I scribbled the Sparkle Pens - Fig, Macaroon and Ocean Wave - on an acrylic block, spritz water on both the block and watercolor cardstock panel, then pressed the block to the cardstock. Once dry, it left a beautiful washed-out blend of shimmery colors.

I stamped the image with Black Archival Ink and adhered to a panel of Crafter's Companion Black Pearl Shimmering Cardstock and added a few sequins. THAT'S IT! See how simple...yet stunning?!!
I love my Sparkle Pens.

To make this into a clean and simple card design, I stamped and heat embossed the sentiment on a white notecard. The image panel is attached with dimensional foam adhesive.

Check out the Spectrum Noir Blog for more fun projects and ideas using the Spectrum Noir Sparkle Pens.

Blessings,


Supplies: 
Spectrum Noir Sparkle Pens
Crafter's Companion Sheena A Little Bit Scenic Silhouette Highlands EZ Mount Stamp Set
Crafter's Companion Sentimentals - Memories Are Made EZ Mount Stamp Set
Crafter's Companion Watercolour Cardstock
Spectrum Noir Ultra Smooth Premium White Cardstock
Crafter's Companion Shimmering Cardstock - Black Pearl
Clear Acrylic Block
Mini Mister
Black Archival Ink
Black Pigment Ink
Sequins
Dimensional Foam Adhesive
Clear Embossing Powder
Heat Gun
Liquid Adhesive

Saturday, May 21, 2016

Creating a Landscape Background

Hello everyone. I've got a new tutorial posted over on the Spectrum Noir Blog. It's a super fun and easy way to create a landscape background using Spectrum Noir Refill Inks.


Click HERE to pop on over and see the Landscape Background Panel step-by-step tutorial.

BONUS!!!
Here's how I created the rest of the card:

1. Stamp and heat emboss the sentiment from Crafter's Companion Bebunni Floral Collection - Bloom & Grow Stamp Set on landscape background panel.


2. Die-cut and emboss the fence using white cardstock. Color the grass using Spectrum Noir Markers DG2, CG2 and DG.

3. In order to make the fence fit perfectly across the background panel, cut it apart as shown. Adhere the 2 ends down on the background panel first, then center and adhere the middle fence piece.


4. Die-cut and emboss the daisy border die from white cardstock. Color the stems, leaves and ground using Spectrum Noir Markers DG2, CG2 and DG3. Color the flowers using CT4, GB3, GB7.

5. Trim off the end of each strip to fit across the panel in front of the fence. Adhere the ends pieces on the fence. Adhere the 2 daisy borders to panel.


6. Die-cut and emboss flowers and leaves from Floral Delight In Bloom Metal Die Set. Color leaves with Spectrum Noir Markers DG2, CG2, DG3. Color flower centers wiith CT4, GB3 and GB7.

7. Snip off the bottom of 1 leaf. This will make 3 pieces to be used for the flowers.


8. Adhere leaves to background panel. Attach flowers with dimensional foam tape.

9. Mount landscape panel to white note card with dimensional foam tape.

10. Add a bit of glitter glue on flowers for sparkle.


DOUBLE BONUS!!!
 Have you seen our challenge this month over at Spectrum Noir? The challenge is to use flowers! What a perfect theme for May..don't you think?!
http://a.pgtb.me/WN4nd8
 Get all the challene and prize details HERE. As always...you could win a little sumpin' sumpin'
 

For more inspiration and creative design ideas using Spectrum Noir Refill Inks, visit the Spectrum Noir Blog. We have TONS of fantastic tutorials, videos and samples to inspire you...no matter what level of coloring you are at.

But WAIT! Even MORE fun hangouts for you!!! Follow us out on these other social places:
Spectrum Noir on Pinterest 
Spectrum Noir on YouTube
Spectrum Noir on Twitter
Spectrum Noir on Facebook


Have a great day!


Supplies:
Spectrum Noir Refill Inks
Spectrum Noir High Gloss Cardstock
Spectrum Noir Markers
Spectrum Noir Ultra Smooth Premium White Cardstock
Crafter's Companion Sheena Decorative Metal Die - Country Fence
Crafter's Companion Sheena Decorative Metal Die - Daisy Border
Crafter's Companion Signature Collection by Sara Davies Floral Delight - In Bloom Die Set
Crafter's Companion Bebunni Floral Collection - Bloom & Grow EZ Mount Rubber Stamp Set
Ranger Archival Ink - Olive
Ink Blending Tools
Clear Embossing Powder
Stickles Glitter Glue - Orange Peel & Yellow
Die-cutting/Embossing Machine
Dimensional Foam Adhesive
Liquid Adhesive
Heat Embossing Tool
 

Tuesday, April 19, 2016

Pastel Pencil Wash

Have you played the April Pastel Color Challenge over at Spectrum Noir? I hope so! We have so many great entries.

For my "pastel color" design, I created a pastel rainbow watercolor wash background. To do this, I used the new Spectrum Noir AquaBlend Watercolor Pencils on woodgrain textured cardstock. Super duper easy! I lightly scribbled each color on the textured cardstock, then used a waterbrush to blend it out.

Pencil colors: Primrose, Papaya, Soft Red, Violet, Sky Blue, Aqua, Bamboo, Kiwi
 

The tag is stamped with a sentiment from My Favorite Things Chalkboard Greetings Stamp Set. I love what it says! It's stamped with Versamark and heat embossed in white. 

Get all the April Pastel Color Challenge details and enter your design HERE.

Have a creative day!

Supplies:
Spectrum Noir AquaBlend Watercolor Pencils
My Favorite Things - Chalkboard Greetings Stamp Set
VersaMark Ink  
White Embossing Powder
My Favorite Things Pierced Tag Die Set
Avery Elle Small Stitched Rectangle Die Set
Cropadile Eyelet Setter and white eyelet
Score Board (The Ultimate Crafter's Companion)
Pink Heart Rhinestones
Colored Cardstock
Paper Cording
Woodgrain Textured Cardstock
Heat Embossing Gun
Watercolor Brush
Dimensional Foam Adhesive
Diecutting/Embossing Machine

Saturday, February 13, 2016

Bloomin' Beautiful!

Happy Saturday! It's a beautiful warm sunny day here in Phoenix. It will be in the mid 80's. It's Bloomin' Beautiful! Which...is actually the name of the stamp set I used to make this fantastic flower background paper. Check it...


I made that background using 1 stamp! Seriously folks...1 flower stamp and 3 post it note masks that I made of the image. No coloring. No embossing. No special positioning tools. Masking is one of my favorite techniques. Have you tried it lately? You totally should!

The stamp I used is from a Crafter's Companion Sheena Little Bit Sketchy Stamp Set called Bloomin' Beautiful. I stamped it 3 times and trimmed them out to make 3 masks. (You can use a post-it note or any other masking paper you have on hand.) Next, I stamped 1 flower on a piece of white cardstock. Then I places the mask over the stamped flower, and stamped another flower. I put another mask on that flower and stamped again. You get the idea. Just keep moving the mask on top of the flower(s) where you are going to be stamping to avoid overlapping the stamped image. Easy as pie.


Once I finished all the flowers, I trimmed and mat on a piece Crafter's Companion Black Pearl Shimmering Cardstock and adhered to the card. For the sentiment, I stamped and white embossed on Black Pearl Shimmering Cardstock. The sentiment is from the Only Words Through The Rain stamp set -- which is also from the Crafter's Companion Sheena's A Little Bit Sketchy Collection. I adhered that to a panel of Coastal Pearl Shimmering Cardstock with dimensional foam. A few aqua rhinestones and satin ribbon completed the design.

TIPS: Stamp a full 8 1/2" x 11" sheet of cardstock, then cut into 4 panels. Great way to create 4 cards all at the same time! If you are in a rush to make a card, try using a larger flower image. Less stamping is needed, which makes for a quick and easy card background!
 
Hope you give this technique a try. Have a wonderful day!


Supplies:
Sheena A Little Bit Sketchy Bloomin' Beautiful Stamp Set
Sheena A Little Bit Sketchy Only Words Through The Rain Stamp Set
Spectrum Noir White Cardstock
Shimmering Cardstock
Black Ink
VersaMark Ink
White Embossing Powder
Anti-static Pouch
Heat Embossing Tool
Rhinestones & Ribbon
Dimensional Foam Adhesive
Masking Paper (or post-it notes)

Thursday, October 15, 2015

Trick or Treat House-Mouse

Me again. I have a tutorial for you over the Spectrum Noir Blog. It's step-by-step showing to make the super easy background on this Halloween card.
 

Not into making Halloween Cards? Not a problem. This background can be switched up and made into any theme you like. That's what is great about being a stamper...right? ;)


The sentiment is stamped and heat embossed with Vivid Green Embossing Powder. The House-Mouse images are stamped, colored, trimmed and adhered with foam adhesive. Everything is colored with Spectrum Noir Markers: Black, FS2, FS3, GB8, GB9, IG2, IG4, IG6, IG8, IG10, GB1, GB3, GB5, OR2, CT2, CT4

Hop on over to the Spectrum Noir Blog an to check out my tutorial. Leave a quick comment so I know you stopped by. I'd love to her from you!

Have a happy day,


Supplies:
Spectrum Noir Markers
Craftwell eBrush (with Spectrum Noir Marker adapter)
Wide Art Masking Tape (or other low-tack stamping mask paper)
Crafter's Companion Circle Die
White Cardstock
Stampabilities Sentiment Stamp
Hero Arts Tree Stamp
House-Mouse Halloween Stamp
VersaMark Ink Pad
Memento Tuxedo Black Ink Pad
Black Soot Distress Ink Pad
Stampendous! Vivid Green Embossing Powder
Anti-Static Pouch
Heat Embossing Tool
Black and Green Cardstock
A Mue Studio Orange polka dot A2 Notecard
Fence Border Punch
Sequins and Rhinestones

Tuesday, July 21, 2015

Woo freakin Hoo

 Well then...


I recently got this stamp set from Taylored Expressions. It's called Party Grumplings. Freakin HILARIOUS!


The grumpy cat is colored with Spectrum Noir Markers:
  • Balloon - DR2, CR5, PP3
  • Cat - EB6, EB1, IG10, IG8, IG4, IG2
  • Shadow - IG1, IG2, Blender

The background is a technique I call "Speckled Watercolor Wash Background." Not sure if that's an official technique name, but it fits for what I did. I used my Spectrum Aqua Markers to paint with.


Doesn't that background look like one of those giant jaw breakers? Like an explosion of yummy on paper! I applied a wash of light blue to the watercolor cardstock panel. After it dried (Confession: I dried it with my heat gun..cause I was impatient!) I flicked other colors on...making sure each color was dry before moving on to the next.
  
The Spectrum Aqua Marker used for the watercolored background:
  • Wash - Teal
  • Flicked Colors - Navy, Bud Green, Gold

It's hard to see, but I did paint on some clear shimmer on the balloon before covering with dimensional glaze. I also added glaze to the cats nose.

I can't wait to color more of these fun "grumpy" critters!


Have a creative day,

Supplies:
Spectrum Noir Markers
Spectrum Aqua Markers
Spectrum Noir Ultra Smooth Premium White Cardstock
Spectrum Aqua Watercolor Cardstock
Taylored Expressios - Party Grumplings
Lawn Fawn Small Stitched Rectangle Stackables Dies
Sheer Shimmer Spritz  - Sparkle
A Muse Studio Ocean Cardstock
Watercolor Brush
3D Crystal Lacquer
Double Sided Foam Adhesive

Tuesday, June 16, 2015

Bokeh with Love

Hey crafty friends! Hope you're having a great day. Here's a card I made using one of the new Crafter's Companion Die'sire Classiques Only Words Metal Dies.


Yep...I'm lovin' these dies.This one is called With Love. These word dies pair up perfectly with all the fun background techniques that are so trendy right now. For my card I did a vibrant watercolor wash and bokeh background. The Word Only die was cut and embossed using Black Pearl Shimmering Cardstock. It really pops against the vibrant colors. Crafter's Companion Shimmering cardstock is drool worthy. Just sayin'


I used Spectrum Aqua Watercolor Markers - Scarlet & Gold - on watercolor cardstock. After letting the wash completely dry, I did the bokeh technique with a DIY circle stencil made by die-cutting circles from a piece of scrap acetate, and sponging white ink. Also, because I'm obsessed with sequins, some fell on there too.


Thanks for stoppin' by,


Supplies:
Die'sire Classiques Only Words - With Love Die
Die'sire Classiques - Circles Dies
Shimmering Cardstock - Black Pearl
Spectrum Aqua Watercolor Markers - Scarlet & Gold
Watercolor Cardstock
White Cardstock
Sponge Dauber
Die-cutting/Embossing Machine
Adhesive
White Ink Pad
Corner Rounder
Sequins

Tuesday, December 9, 2014

Lucy Skates

Hey crafters! Did you happen to see the cool video tutorial over on the Spectrum Noir Blog? Sara Naumann shows a really fun way to use Spectrum Noir Ink refills. Go check it out HERE.

This is a card I designed using the same techniques in the video...


The Spectrum Noir Ink Refill colors I used are BT3 and IG1. The Spectrum Noir Markers I colored with are: 
  • Skin - FS2, FS3, CR2
  • Hair - GB1
  • Pants & Gloves - IG1, IG4
  • Jacket & Skates - IG1
  • Hat & Scarf - BT1, BT3, BT4
  • Ground - BT1
  • Flower - CR8 (I actually used a lighter red first. I think it was CR2. But I wanted it darker - so added CR8 on top)
I stamped the skater and sentiment in black and embossed in clear. The snow dots are stamped with Colorbox Archival Ink - Seattle Sky. The swish on the ground I drew with a light blue marker and added crystal glitter. I also added glitter o all the snow dots.


I just love these stamps from Eat Cake Graphics - Lucy's learning to skate, Look a lot like Christmas. and Snow dots. The tree border die is from Poppystamps and the stencil to make the snowflakes is Dylusions. Looks so cool! Under the tree border is Washi tape - then bakers twine wrapped around the panel.

I can't wait to make more designer backgrounds using my SN ink refills! Go give this technique a try. You will love it too!

See ya later!


Wednesday, August 20, 2014

The best thing you can wear...

...is a Smile.

Happy Hump Day everyone! I've got a really cool project today. Hope it makes YOU smile as much as it does me.


I got my idea from 2 tutorials over on the Spectrum Noir Blog. Grid Background and Background Fun with Blender Pen Refill. Go check out those tutorials! Fun and easy ways to use your Spectrum Noir Markers for more than just coloring a stamped image!

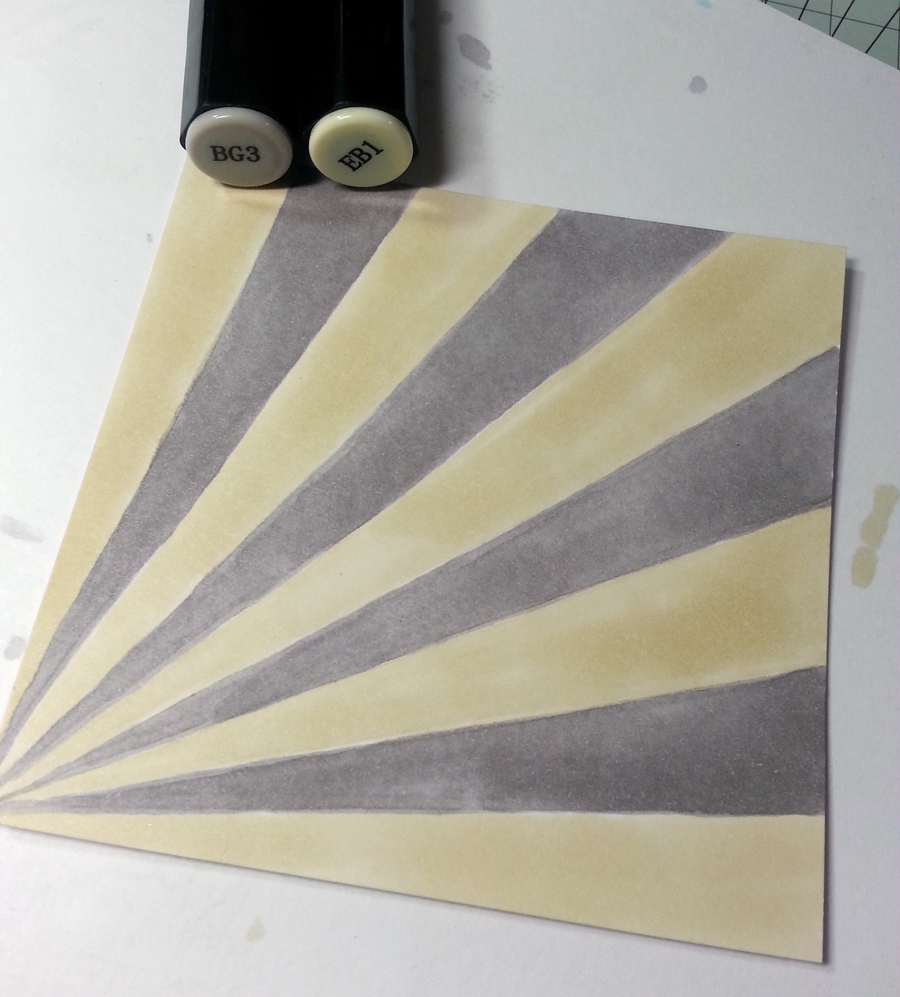
I decided to make angled lines instead of the grid blocks as shown in the tutorials. My paper panel is 4" x 4"

It was super easy to mark off my cardstock panel, using the grid on my cutting mat. I used a couple pieces of washi tape to hold my paper in place. The lines darker than I normally make them...just so you could see in the picture -- but I erased them back to super super light before I started coloring. When YOU do this...draw the lines really light...just enough so you can see 'em.


Next, I colored all the darker sections with BG3. I let them dry before coloring the other sections with EB1. I used the chisel end of the marker. It's easy to get in the tight spots with the chisel simply by turning the angle of the pen.


Here's how it looks all colored in. Then I took my bottle of Spectrum Noir Alcohol Blender Marker Ink Refill and made drips and splatters. Make sure to let the panel completely dry before stamping!


The images are stamped with Memento Luxe Espresso Truffle ink. I love how the sentiment from Crafter's Companion Vintage Collection Sentimentals - Verses set goes perfectly with the vintage camera image from Crafter's Companion Stamp-It Australia Dreamer - Once in a Lifetime set. love love love love LOVE! :)

THEN...I took some tiny chipboard stars from Um WOW Studios and embossed the tops with Ranger Liquid Platinum.
Here's the before picture -- naked chipboard


Pick up the little star with your tweezers -- tap it on a Versamark Ink pad -- dip it in the embossing powder and zap it with the heat gun.
Now we have dressed up chipboard....


Thanks for stopping by today.

I hope you're wearing a smile today!


PS -- Don't forget about the Birthday SALE going on this week over at Crafter's Companion USA! The bargains are SURE to put a grin on your face! And AWESOME prizes are up for grab each day over on Facebook!