Showing posts with label UmWowStudio. Show all posts

Thursday, October 16, 2014

NEW Decorative Stencils from Crafter's Companion

I'm SUPER EXCITED to share the NEW Sheena Decorative Stencils that are now available from Crafter's Companion USA. In addition to the new stencils, there's NEW stamp sets added to the Sheena Douglass - A Little Bit Magical Collection. Great new products!

For my card design, I used the new Deer and City Trees stencils. Each stencil is 8" x 6", but I only used a portion of each.


I was able to achieve this stunning texture on the trees by using Glossy White Dreamweaver Embossing Paste mixed with some Eye of the Tiger Dreamweaver Metallic F/X. I spread the paste over the stencil on Gold Dust Shimmering Cardstock. After removing the stencil, I immediately dusted additional metallic powder over the wet embossing paste. I let the paste dry slightly (15 - 20 minutes or so) then used a soft paintbrush to brush around the loose metallic powder. Next I heat it with my embossing gun. The result was an awesome bumpy texture...which I LOVE!

Once the piece was cooled off, I used a soft rag to rub the excess powder around the cardstock -- and help clean off any loose powder. (Actually...I think I used my finger...and then the soft rag! LOL) This is just one of the ways you can use the embossing pastes. If you prefer a smooth finish, don't use a heat gun. Just let the paste dry completely on it's own.


I sponged the deer onto the piece with Aged Mahogany Distress Ink. For the snow, I spread the white embossing paste freehand using the Palette Knife. While still wet, I sprinkled with glitter - then let completely dry.


The sentiment is from Vintage Christmas Collection Sentimentals - Season's Greetings set. I've stamped on vellum and heat embossed with white embossing powder. I added a little chipboard star as if it were on top of the tree.

Check out all the great NEW products on the website HERE. FYI - Crafter's Companion is also selling Dreamweaver Embossing Paste and Accessories too! SCORE!!!

Fun stuff!!!

Tuesday, August 26, 2014

Yeeehaw for Sepia!

Howdy Folks!

I thought it would be fun to color an image in Sepia Tones using my Spectrum Noir Markers. This image from The Greeting Farm is perfect for this project.


I stamped the image on Spectrum Noir Ultra Smooth Premium White Cardstock with black ink -- then colored:

Skin - TN3, TN2, TN1, FS2
Hair - EB5, EB4, TN7, TN5, TN3, EB1
Hat, Shirt, Skirt - GB8, EB2, EB1
Boot, Gloves, Scarf, Belt, Skirt Ruffle - BG1, BG5, BG7


I fussy cut the image and popped it on the card with foam adhesive. I added a touch of glitter to her hat, the star on her boot and on her belt. I thought she needed a little more "bling" - so I gave her some cowgirl rhinestone earrings.


The sentiment is stamped and heat embossed on vanilla cardstock. I cut little strips of patterned paper to make it look like a ribbon. The chipboard star is covered with embossing powder and topped off with a little rhinestone. Isn't she Cheeky :)

My card layout is from Splitcoaststampers Sketch Challenge #502. I did a mirror image of it.

As always, thanks for visiting my blog!


Supplies used on card:
Markers - Spectrum Noir TN1, TN2, TN3, TN5, TN7, FS2, EB1, EB2, EB4, EB5, GB8, BG1, BG5, BG7 
Stamps - The Greeting Farm; A Muse Artstamps
Inks - Memento Tuxedo Black, Versamark
Paper - Spectrum Noir Ultra Smooth Premium White Cardstock; A Muse Studio Wheat, Onyx and Vanilla; Adorn-it Wild West, Karen Foster Stars, Mustard Paisley
Misc - UmWow Studio Chipboard Confetti Stars, A Muse Studio Rhinestones, Stampendous Mushroom EP, Ranger Liquid Platinum EP, Art Glitter Flax glitter, Glitter Ritz Warm Highlights Ultrafine glitter; Oval Punch, Twine

Wednesday, August 20, 2014

The best thing you can wear...

...is a Smile.

Happy Hump Day everyone! I've got a really cool project today. Hope it makes YOU smile as much as it does me.


I got my idea from 2 tutorials over on the Spectrum Noir Blog. Grid Background and Background Fun with Blender Pen Refill. Go check out those tutorials! Fun and easy ways to use your Spectrum Noir Markers for more than just coloring a stamped image!

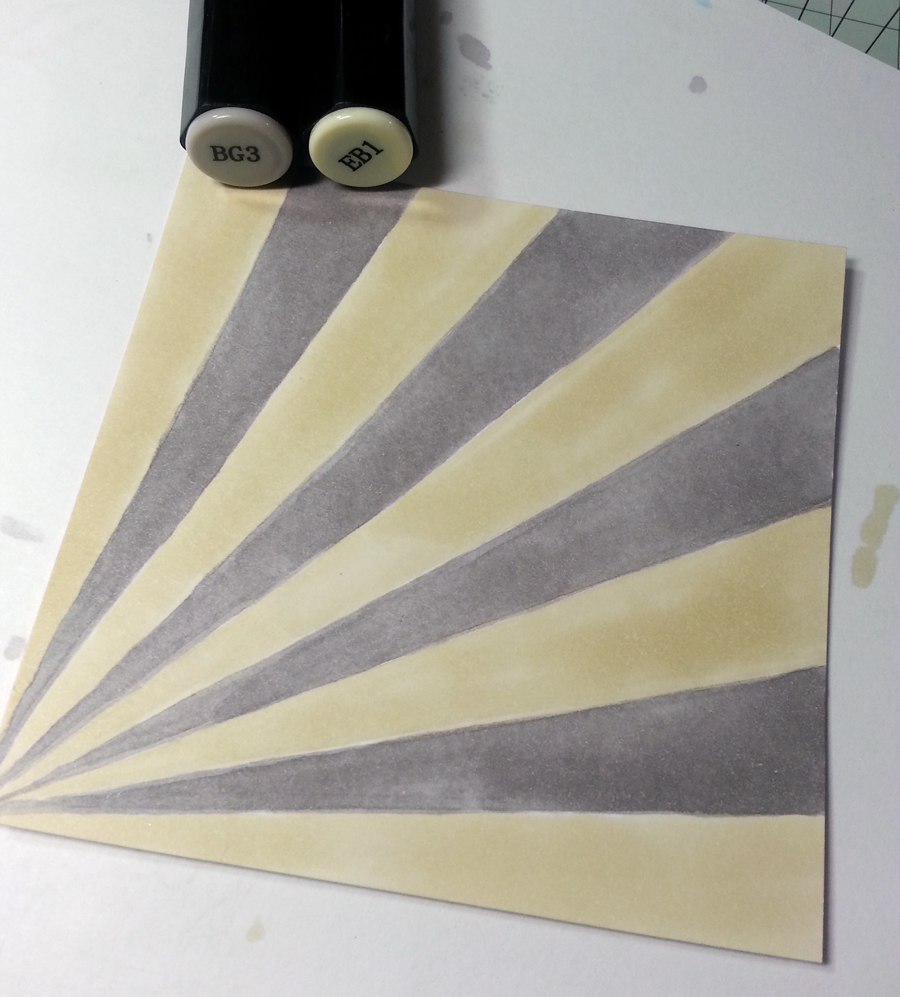
I decided to make angled lines instead of the grid blocks as shown in the tutorials. My paper panel is 4" x 4"

It was super easy to mark off my cardstock panel, using the grid on my cutting mat. I used a couple pieces of washi tape to hold my paper in place. The lines darker than I normally make them...just so you could see in the picture -- but I erased them back to super super light before I started coloring. When YOU do this...draw the lines really light...just enough so you can see 'em.


Next, I colored all the darker sections with BG3. I let them dry before coloring the other sections with EB1. I used the chisel end of the marker. It's easy to get in the tight spots with the chisel simply by turning the angle of the pen.


Here's how it looks all colored in. Then I took my bottle of Spectrum Noir Alcohol Blender Marker Ink Refill and made drips and splatters. Make sure to let the panel completely dry before stamping!


The images are stamped with Memento Luxe Espresso Truffle ink. I love how the sentiment from Crafter's Companion Vintage Collection Sentimentals - Verses set goes perfectly with the vintage camera image from Crafter's Companion Stamp-It Australia Dreamer - Once in a Lifetime set. love love love love LOVE! :)

THEN...I took some tiny chipboard stars from Um WOW Studios and embossed the tops with Ranger Liquid Platinum.
Here's the before picture -- naked chipboard


Pick up the little star with your tweezers -- tap it on a Versamark Ink pad -- dip it in the embossing powder and zap it with the heat gun.
Now we have dressed up chipboard....


Thanks for stopping by today.

I hope you're wearing a smile today!


PS -- Don't forget about the Birthday SALE going on this week over at Crafter's Companion USA! The bargains are SURE to put a grin on your face! And AWESOME prizes are up for grab each day over on Facebook!

Friday, June 20, 2014

Dream a Little Dream

Hey there crafty friends!

I'm STILL having tons of fun playing with watercolors. Have you jumped on the watercolor boat yet? It's completely addicting!

On this card I did a "Stamped Emboss Resist + Watercolor Wash" technique. I stamped the background image from Crafter's Companion Stamp-It Australia Dreamer - Once in a Lifetime set on watercolor cardstock with VersaMark ink and embossed with clear embossing powder. Then I applied a "wash" of watercolor paints. 


I KNEW this stamp would work perfectly for this technique! Isn't it DREAMY! Like....UmWow! Speaking of UmWow...the "flair" button and chipboard stars are from UmWowStudio.com. UmWowStudio is a family owned business specializing in laser cut chipboard elements and masks for the paper crafting and mixed media community. You can check 'em out HERE. They were so kind to offer our design team some of their products to play with. Thank you!

I took the chipboard stars and did a couple layers of white pigment ink -- then added holographic embossing powder. They're absolutely stunning against the background.


I added a few blue rhinestones and some silver cording...then mat the panel on dark purple cardstock. The entire piece is adhered to an ocean blue card base with double-sided adhesive foam.


Have a dreamy weekend :)

Products used on card:
Tim Holtz Watercolor Cardstock
Watercolor Paints
Clear Embossing Powder