Showing posts with label Memory Box. Show all posts

Wednesday, April 22, 2015

Fresh Brewed Designs Challenge

Hi! Today is another fun challenge over at Fresh Brewed Designs. Ready...Set...GO!

The Challenge Theme: So Cute

I decided to use one of the images from the Cutie Bug Collection for my project. This one is called Cutie Bug Latte.


I think this little cutie bug is just adorable! I colored with Spectrum Noir Markers:

  • Bugs body LY1, CT2, CT4, GB7
  • Coffee cup TN1, EB5, Blender
  • Shading around image BG1, Blender

I used a cloud stencil and sponged with Tumbled Glass Distress Ink. Then I diecut the panel and sponged Broken China, Black Soot and Mustard Seed inks. The sentiment diecut panel has just a hint of glitter on the edge.


I added a couple layers of the image for dimension. The wings have glitter on them, and the feet, nose and ends of antenna I added Black Glossy Accents. A few sequins for good measure :)

I hope you can join the challenge with us. Visit the blog for all the details, and to see the other fun projects from the design team.

http://freshbreweddesigns.blogspot.com/

Catch ya later!

Supplies
Fresh Brewed Designs Digi Images - Cutie Bug Latte, Feel Better Soon Sentiment
Spectrum Noir Markers
Distress Inks
Memory Box Die
Lawn Fawn Die
Pretty Pink Posh Sequins
Black Glossy Accents
Crystal Glitter
Foam Adhesive
Inky Antics Cloud Stencil
Misc Cardstocks

Friday, March 20, 2015

Spring is HERE!

Hello my crafty friends,

Today is the First Day of Spring. Are you excited?! Well...it looks like these little guys are!


I just adore all these fun stamps from Eat Cake Graphics. They make me soooo happy! I colored with my Spectrum Noir Markers as follows:
  • Leaves CG4, CG3, CG1 
  • Grasshoppers DG3, CG2, CG1
  • Eyes IB2 
  • Flowers GB4 
  • Background BT1, GG1, Blender 
I stamped the leaves and grasshopper again on white cardstock, colored and fussy cut. You can see in the closeup pic how I popped up some of the leaves and the jumping grasshopper. I also added some glitter and glaze.


For the clouds I hand-cut a stencil and sponged Tumbled Glass Distress Ink. The die-cut cloud is from Memory Box, and worked perfectly for the sentiment. I also sponged a bit of distress ink on the top edges of that piece, plus added a few orange rhinestones.

The Eat Cake Graphics stamps that I used to design my fun first day of Spring card:

5028-B Grasshopper
7031-I Plant
7003-C Baby's breath (right)
7004-C Baby's breath (left)
7020-D Row of grass

Happy Spring!
Spring

Saturday, October 25, 2014

Pumpkin Patch Challenge REMINDER

Poppin' in quick to remind you to play along with us over at Fresh Brewed Designs.

Our challenge theme  is "Pumpkin Patch". 
Get all the challenge details and see more fun design team samples HERE.
You  have until the 28th to join the fun...and be in the drawing to win some digi images!

I'm using Give Thanks Pumpkin from Fresh Brewed Designs again.


The image is colored with Spectrum Noir Markers:
Leaves - EB1, EB3
Pumpkin - GB4, GB7, FS9
Stem - GB10


This time I loaded on the bling with rhinestones and glitter cardstock. Can't EVER have enough :)


 Click HERE to see the other card I made using this same digi image.

Thanks for stopping in,

Supplies:
Fresh Brewed Designs Give Thanks Pumpkin digi image
Spectrum Noir Markers  EB1, EB2, GB4, GB7, GB10, FS9
DCWV Fall Papers and Glitter Cardstock
A Muse Studio Onyx Cardstock, Sugar Cardstock
Paper Smooches Leaves 2 Dies
Memory Box Ivy Trellis Die
Studio 18 Rhinestones
Foam Dimensional Adhesive

Wednesday, July 9, 2014

Thinking of You

I'm always looking for cool ways to use my stamps and supplies. Today I'm sharing an easy die-cutting technique that can be used to show off a sentiment.

First thing I did is take a piece of white cardstock and sprintz 2 colors of ink sprays on it. I zapped it with my heat gun to speed up the drying time. 


Next I stamped the sandcastle silhouette image from Sheena's A Little Bit Scenic - Silhouette Highlands stamp set with black ink. Easy so far...right ;)

I wanted to place more focus on the sentiment - so I die-cut a cloud on the sprayed panel to create a "recessed" cloud. This is gonna worked perfect! Look at all the different layers and dimension in the close-up pic.


I stamped a sentiment from Vintage Florals - Sentimentals and on a piece of white cardstock -- and adhered it with foam tape behind the "recessed" cloud opening. I popped a couple smaller die cut clouds on top with foam tape. Next, layer the entire panel on yellow cardstock with foam tape -- and then adhere the entire panel flat to a white cardbase. AWESOME!!!


The last thing I did was add a die cut pail & shovel along with some "sand" - which I created by sprinkling some Flowersoft Ultrafine Sand on top of Antique Linen Distress Stickles.

Look at that shimmer!

Tip: Die-cut small shapes a few extra times and stack them together with glue. This makes 'em sturdy...plus adds dimension.

Don't forget to play our Monthly Challenge over at Crafter's Companion USA -- Show Off Your Sentiments


Thanks for stopping by!

Supplies
Crafter's Companion Vintage Florals - Sentimentals Stamp Set
A Muse Studio cardstock
Bazzill cardstock
Black Archival Ink
Dylusions Calypso Teal Ink Spray
Tattered Angels Crushed Shells Glimmer Mist
Memory Box Cloud Die Set
FlowerSoft Ultrafine Sand
Ranger Antique Linen Distress Stickles
3D Foam Adhesive

Friday, May 30, 2014

Shame on you Granny Gertz!

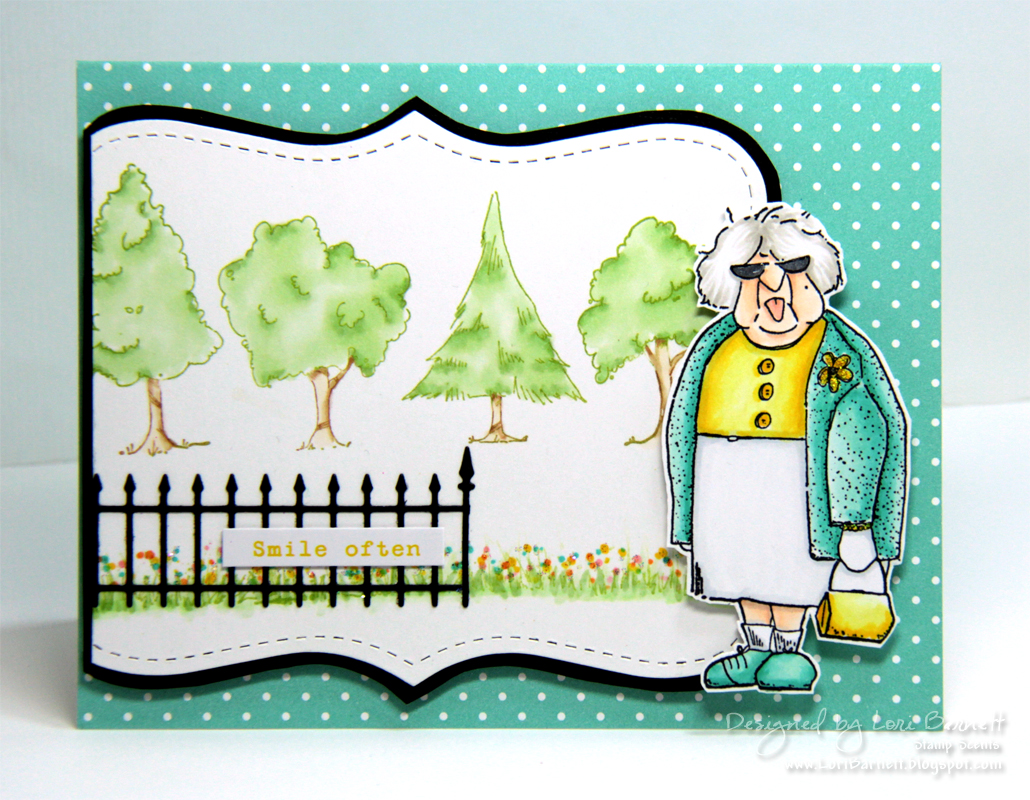
Granny Gertz was taking a leisurely stroll in the part when she came upon a little sign on a fence that said "Smile often"  Here's her reaction:


Granny sure has a sense of humor...doesn't she?! Such a rebel! ha ha ha ha ha. She puts a smile on my face! How about you?


I know Granny Gertz is rollin' on the floor laughing right now! LOL!  I love her ;)

To get more details on how I created this little card scene, visit the Eat Cake Graphics blog - A Sprinkling of Samples and Techniques.

Hey...I'll make it easy for you to go shopping...just click the image below and you're on the way to fill your cart!
Shop online at Eat Cake Graphics

Well...what did you buy? *snicker*

Have a fun day. And don't forget to "smile often" ;)

Supplies
Paper - A Muse Studio Sugar and Dots; Bazzill Black
Inks - Memento
Dies - Memory Box Fence; StampinUP! Top Notch Label
Misc. - Cosmo Cricket Sticker; Art Glitter; Markers; Clear Glaze Pen

Monday, May 19, 2014

Watercolor Backgrounds

I've been VERY busy the last couple weeks. It's been a good busy! One of the things I've been doing is the on-line Watercolor for Cardmakers class. Yep...I've been making fun watercolor creations. It's like the hottest trend in paper crafting right now!!! This class is great! Some of the techniques seem so easy...while you're watching the videos...and THEN...hummm. Let's just say I have a pile of "special" pieces. HA! But that's ok...cause I'm having fun...and that's what matters most. Here's a few that made it to a complete card. (products listed at bottom of post)

I used watercolor paints and a stencil to create this soft color wash background.


The fun sequins really add to the design. The "real" color of the round flat sequins shows up better in the closeup pic. They add that extra little "pop" of bright color...which really kicks things up a notch. Aren't those flat star sequin and star rhinestones great?! BTW- if you need a sequins "fix" - Simon Says Stamp is the hook-up! You're welcome ;)


The next two cards were created with distress inks and acrylic blocks.


 "hello" is diecut from white cardstock - 4 times - then stacked for dimension.


I did the same thing with the flower die -- cut it out 4 times & stacked. The sentiment is embossed with white ep on black cardstock.


It was sooooo fun creating these cards with watercolor backgrounds. I'm sure I'll have more to share, as soon as I get 'em finished and photographed. Don't hold your breath....just sayin'!


Have a GREAT Monday!
 

Lucky Stars Card
Stamp: Hero Arts- Darling Sentiments (Studio Calico)
Stencil: Memory Box - Stars Starry Night
Die: My Favorite Things - Jumbo Cloud Stax
Sequins: Simon Says Stamp and Studio Calico
Rhinestones: A Muse Studio
Ink: Versafine Onyx Black
Watercolor Paints
Watercolor Paper

Hello Card
Die: Simon Says Stamp - Small Hello
Ink: Ranger Distress Inks
Watercolor Paper

Think of You Card
Stamp: Simon Says Stamp - Like Your Style Set
Die: Simon Says Stamp - Tall Flowers
Ink: Ranger Distress Inks; VersaMark
Watercolor Paper
White Embossing Powder 
Embossing Magic

Monday, July 1, 2013

Yummy Berries

Hello again....and HAPPY JULY 1st!

Are ya hungry for another House-Mouse & Friends Challenge?  Well alllllllrighty then...here we go!!!

House-Mouse & Friends Monday Challenge #148 - Food
Create any project you like (card, scrapbook page, recipe card, treat container, etc.) and include at least one House-Mouse, Happy Hopper or Gruffies image along with the "food" theme.  Yummy stuff!!! Don't forget to check out the delicious samples all the designers came up with...and get all the challenge details on the blog HERE.

Here's mine using an image called Berry Tired:


I colored with pencils & Gamsol (LOVE) ...then trimmed out the images. The sentiment strip has mouse prints stamped with A Muse Studio Grass ink and is popped up with foam tape.  I also used 2 awesome dies -  Ivy Trellis from Poppy Stamps and Cornerstone Seal from Memory Box.
 Anyone else have an addiction to dies lately?
I wish you could see my card in person.  It's sooooo sparkly...ya just wanna eat it!  


The strawberry seeds have Ruby Red Microfine Art Glitter on them.  I also colored with a clear glaze pen to make them even more juicy looking.  YUMMMM!!!

I'm sure you are hungry to create something....so let's see what you bring to the table! Make sure to share a link on our blog.