Showing posts with label Calendar. Show all posts

Wednesday, April 5, 2017

April 2017 Calendar Page

It's April! That means it's time to flip the calendar page. I seriously love how this months page came together. Totally makes me think Spring. I used the most adorable Die'sire Essentials die set from Crafter's Companion called Nature, along with beautiful papers from Sara Davies Rustic Cottage Signature Collection 6"x6" Paper Pack.


To create the soft yellow background on the page, I used a Mini Ink Blending Tool to apply a light blend of Mustard Seed Distress Ink.


I die cut extra layers of the branch and birds from kraft cardstock, and adhered them together to make the them thicker. This makes them sturdy, and easier to adhere to the page. The cloud to the far right is popped up with dimensional foam adhesive, the other 2 are glued flat to the page.


For a little Spring bing bling, I added tiny rhinestones to the eyes. And because it's Spring...I gave momma bird a nest to sit on.


Have a great day!

Check out the Crafter's Companion Pinterest Gallery for great ideas and tons of inspiration.


Supplies
Crafter's Companion USA Die'sire Essentials Dies - Nature
Crafter's Companion USA Rustic Cottage 6x6 Paper Pack
Crafter's Companion USA Kraft Cardstock
Gemini Machine
Distress Ink Mustard Seed
Ink Blending Tool
Art Glitter Elements - Earth Textures
Liquid Adhesive
Crystal Rhinestones

Dimensional Foam  Adhesive

Tuesday, March 7, 2017

March 2017 Calendar Page

Here's my calendar page for this month. As an added bonus...I've got a Tip-to-Tip Marker Blend Technique Tutorial over the Spectrum Noir Blog.
 

To make the 4-leaf clover and pot of gold, I used a heart die and pocket die from the Crafter's Companion Little Angel Signature Collection by Sara Davies - My First Outfit Die Set. This collection is baby themed, however I was able to use it for something totally different. I love stretching my supplies and using them in ways there weren't intended.


But wait! I have a double-bonus for you! An adorable 4-bar size note card.


I used the same heart and pocket die, and added in the shirt die

Here's a little story. Some of you might relate. When I was a kid, on St. Patrick's day we would go around look for someone who wasn't wearing green so we could pinched them!
LOL!

So the first thing that popped in my head when I was making a St. Patty's Day card was to WEAR GREEN to avoid the pinch! And there you have it. A shirt with a lucky 4-leaf clover on it.


The embossed detail on the shirt die really stands out by sponging on some Gathered Twigs Distress Ink. And the sequins.....BLING BLING! Love it!

Head on over to the Spectrum Noir Website and check out my Tip-to-Tip Marker Blend Tutorial. Thanks for stopping by today!


Monday, January 16, 2017

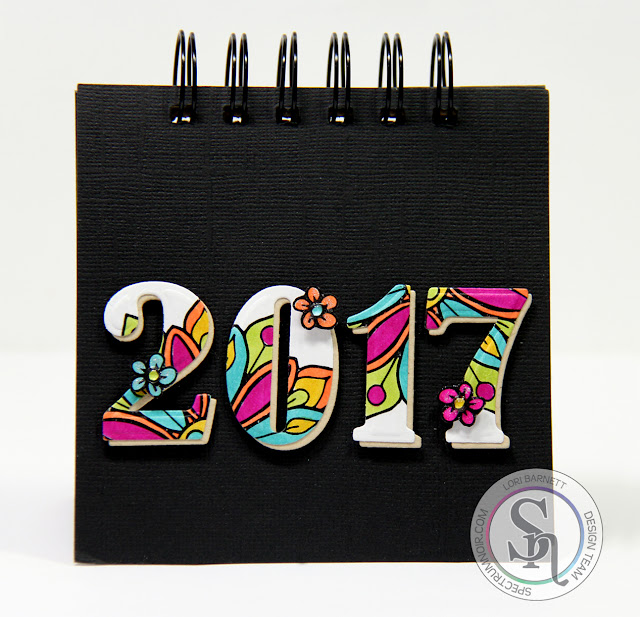
2017 Calendar

It's time for my new year calendar. For the cover, I went with a simple design.


I stamped images from the Spectrum Noir Colorista Elements 3 Stamp Set from Crafter's Companion on Spectrum Noir Ultra Smooth Premium White Cardstock. Then I colored them with Spectrum Noir Colorista Markers - Set 6.  I colored over the tiny flowers with my Clear Spectrum Noir Sparkle Pen. The numbers are die-cut twice - once from the colored image and again from Kraft Cardstock.

The number dies are from Sara Davies Signature Birthday Party Collection - Fun With Numbers that were recently released on HSN.


I fussy cut the tiny flowers and added a clear droplets to the centers. I layered the kraft cardstock on the backs -- but slightly shifted. This really adds dimension, and pulls it together with the inside calendar pages.

For the January page, I die-cut the pieces from a super fun Essentials Die'sire 6 piece Treats Mini Die Set that Crafter's Companion just was also just released on HSN.


The mug is die-cut from Watercolour Cardstock 2 times. I colored the pieces with Spectrum Sparkle Pens, then layered the pieces together.
  • Mug: Moonstone, Aquamarine & Peacock
  • Coffee: Smoked Quartz
  • Steam: Clear

I just love the shimmer that the Sparkle Pens have. And...they color on the watercolour cardstock ah-mazing! Isn't that die-cut doily adorable?! The mug is popped up with dimensional foam.

Have a wonderful day,

Sunday, January 8, 2017

December 2016 Calendar Page

Hello friends. I've been away from blogging for almost the entire month of December. And now we are 1 week into January of 2017. MAN does time fly. I hope you are all doing well and had a nice holiday.

Here's my last calendar page for my 2016 Calendar Project. I hope I've inspired you to make your own calendar for 2017.


I diecut the Snowflake Trio dies from the Crafter's Companion - Sara Davies Signature Collection - Festive Wonder using a Stick-It adhesive sheet (no paper...just the adhesive). Then I carefully removed 1 side of the release paper from the die-cuts and placed on the page. Before removing the top release paper, I lightly sponged blue ink around the snowflakes. After removing the top release paper to expose the sticky adhesive, I covered the snowflakes with crystal microfine glitter. Oh MAN is it ever sparkly.


The little house (which I'm sure on the inside was decorated beautifully for Christmas 😉) and trees are pieces that I snipped off of the Scenic Borders Die Set from Crafter's Companion Contemporary Christmas Collection. I also added some white snow "dots" using a white gel pen, and a few light blue rhinestone gems. I just love how clean, cool and simple this page turned out.

Here's all the pages from my 2016 Desktop Calendar:


Thanks for stopping by!

Smiley from Millan.Net
 

Tuesday, November 15, 2016

November 2016 Calendar Page

Here's my calendar page design for this month.


I die-cut felt and burlap using Crafter's Companion Die'sire Mixed Media Dies - Autumn Leaves and Contemporary Hearts die sets. These Mixed Media Dies are ah-mazing! They can be used on a variety of surfaces as they will cut up to 1.4mm deep. Die cutting felt and burlap was a breeze!


I added Stick-It Adhesive to the back of the materials before die-cutting. Then it was simple to just stick the pieces down on the calendar page. A little green crystal rhinestone was the perfect finishing touch.

Have a beautiful day,


Supplies:
Crafter's Companion Die'sire Mixed Media Autumn Leaves Die Set
Crafter's Companion Die'sire Mixed Media Contemporary Hearts Die Set
Gemini Die-cutting Machine
Stick-It Adhesive Sheets
Felt
Burlap
Rhinestone

Tuesday, October 11, 2016

October 2016 Calendar Page

Hello Crafty Friends!

Here's my calender page for this month. It turned out sooooo CUTE!


EEEK! I love it!!! I used the Crafter's Companion Halloween Trick or Treating Stamp set.

 
These little trick or treater kids can be used all year long. They would be fun on birthday cards and all sorts of other occasions. I stamped, colored and fussy cut the cute little witch. She is popped up with dimensional foam. The web image is stamped and embossed with Holographic embossing powder. Super sparkly!


To make the black rhinestone stars, I colored crystal stars with the Black Spectrum Noir Marker. The images are colored with Spectrum Noir Markers and Spectrum Noir Sparkle Pens as follows:

Spectrum Noir Markers:
Skin - FS2, FS7, TN2, CR3
Black areas - IG1, IG3, IG5, IG7, IG9
Dress - PL1, PL4, BG6, CT4, OR2, CG3, CG4
Moon - CT2, CT4, GB6
Spider Eyes - CT4
Rhinestone Stars - Black

Spectrum Noir Sparkle Pens:
Moon and Spider Eyes - Moonlight
Shoes, Hat, Wand Stick, Kitty Whiskers - Crystal Clear


I stamped the spider on the page and used a fine tip black marker to extend the web line to the top of the page. Then I stamped the spider again, colored and cut out just the body. If you look real close, you can see the eyes are shinny. I used a Versamark Ink Marker to color in and heat set with clear embossing powder.

Check out all our great design team projects for more inspiration on:

Facebook - Crafter's Companion USA and Spectrum Noir
Instagram - Crafter's Companion USA and Spectrum Noir
Twitter - Crafter's Companion USA and Spectrum Noir
Pinterest - Crafter's Companion USA and SpectrumNoir
Websites - Crafter's Companion USA and Spectrum Noir


Have a fun day!


Supplies:
Crafter's Companion Halloween Trick or Treaters Stamp Set

Spectrum Noir Ultra Smooth Premium White Cardstock
Spectrum Noir Markers
Spectrum Noir Sparkle Pens
Adhesive Tape Runner
Ranger Distress Ink - Twisted Citron
Memento Tuxedo Black Ink
Versafine Black Ink
VersaMark Ink Pad
VersaMark Marker
Black Fine Line Pen
Ranger Holographic Embossing Powder
Anti-Static Powder
Heat Embossing Gun
Dimensional Foam Adhesive
Clear Embossing Powder

Friday, September 9, 2016

September 2016 Calendar Page

Happy Friday friends!

I've been so busy with EVERYTHING lately. How about you? I finally got a chance to get this months calendar page posted for you to see. Check it...


Since most schools are back in session by September, I decided this page would be encouragement to achieve. I'm loving how it turned out! Here's how I made it:

  1. Stamp image from Textures - Journal Jotting stamp set, using Chipped Saphire Distress Ink.
  2. Stamp sentiment from Sentimentals - Ornate stamp set, using Fired Brick Distress Ink.
  3. Stamp images from Sentimentals - Ornate stamp set, using Scattered Straw Distress Ink. Add Yellow stickles glitter glue to some of the stamped areas. Set aside to dry.
  4. Die-cut the small bird and wing from Just For Men Paper Pad Brights Collection. Use GB4 Spectrum Noir Marker color in the stars on the wing piece.
  5. Sponge Chipped Saphire ink around edges of wing, and Fired Brick ink around edged of bird.
  6. Adhere wing and rhinestone to bird body. Attach bird to calendar page using dimensional foam tape.


Isn't it great how you can "Achieve" a fantastic little design with just a few stamps, dies and inks? You could used this design for a card front too!

Make sure following us to get all the latest news, tutorials and inspiration:

Facebook -- Crafter's Companion USA and Spectrum Noir
Instagram - Crafter's Companion USA and Spectrum Noir
Twitter - Crafter's Companion USA and Spectrum Noir
Pinterest - Crafter's Companion USA and SpectrumNoir
Websites - Crafter's Companion USA and Spectrum Noir

Thanks for stopping by today!


Supplies:
Crafter's Companion Textures Artist Collection Words of Wonder - Set 1 Stamp Set
Crafter's Companion Sentimentals - Ornate Stamp Set
Crafter's Companion Just For Men Signature Collection 6" x 6" Paper Pad - Brights Collection
Crafter's Companion Mixed Media Dies - Tweet Tweet set Spectrum Noir Marker - GB4
Spectrum Noir Ultra Smooth Premium White Cardstock
Adhesive
Dimensional Foam Adhesive
Ranger Distress Inks - Fired Brick, Scattered Straw, Chipped Sapphire
Stickles Glitter Glue - Yellow
Rhinestone - Color with marker to match if you don't have the right color rhinestone.
Gemini Diecutting/Embossing Machine

Tuesday, August 2, 2016

August 2016 Calendar Page

...and then all the sudden....BAM! It's August!

Here's my calendar page for this month. Totally lovin' how it turned out!


I used the Crafter's Companion Walls and Corners stamp set from the Textures Artist Collection to stamp the sun rays. Quick and easy - just inked up with 3 colors of Distress Inks. Then I tapped on some Moonlight Spectrum Noir Sparkle Pen, and stamped on the page. Super sparkly in real life!

For the fun and funky sunglasses, I used Sheena's A Little Bit Scenic - French 50's Cafe stamp set. I treated a piece of white cardstock with anti-static pouch, then stamped 3 different colors of Distress Inks. Then I quickly added clear embossing powder and heat embossed. Once cooled, I colored the lens area with Spectrum Noir Markers IG8, IG6, IG4 and IG2. Lastly, I used a Versamark Ink marker to color over the glasses, added clear embossing powder, then heat embossed.


After trimming out the sunglasses, I inked around the edges to finish them off so the white paper didn't show. They look really cool! I adhered the green and blue glasses flat, then popped up the red pair.


Have a happy day!

Supplies:
Crafter's Companion Textures - Walls and Corners Stamp Set
Crafter's Companion Sheena A Little Bit Scenic - French 50's Cafe
Spectrum Noir Markers: IG8, IG6, IG4, IG2
Spectrum Noir Sparkle Pen - Clear Overlay
Spectrum Noir Sparkle Pen - Shades of Spring Set
Spectrum Noir Ultra Smooth Premium White Cardstock
Ranger Distress Inks - Twisted Citron, Mermaid Lagoon, Abandoned Coral (Sunglasses)
Ranger Distress Inks - Squeezed Lemonade, Mustard Seed, Spiced Marmalade (Sun rays)
Clear Embossing Powder
Versamark Ink Marker
Anti-Static Pouch
Heat Embossing Tool
Dimensional Foam Adhesive
Tape Runner

Monday, July 11, 2016

July 2016 Calendar Page

Hello friends. Just poppin' on here quick to share my July calendar page. Believe it or not...it was really hard to decide which stamp image I wanted to on this months page. Crafter's Companion has soooooo many fantastic patriotic stamp images! I went with the Patriotic Pride Stamp Set. It's packed full of stamps that can be used all year long. If you don't already have this set...go get it! I KNOW you'll love it.


I stamped using Salty Ocean and Festive Berries Distress Inks. That was easy...right ;)

For the stars, I made my own shimmery yellow cardstock by coloring a scrap of white cardstock with my Spectrum Noir Moonlight Sparkle Pen. After it dried, I die-cut 3 stars using the smallest star from the Superstars Die Set, which is part of Sara's Signature Collection Just For Men. I added glitter to the edges and popped up with dimensional foam adhesive.


This would make a fantastic card design. Just add whatever sentiment you like.


Thanks for stopping by today. Hugs to you all!


Supplies:
Crafter's Companion Patriotic Pride Stamp Set
Crafter's Companion Just For Men Superstars Die Set
Spectrum Noir Sparkle Pen - Moonlight
Spectrum Noir Ultra Smooth Premium White Cardstock
Die-Cutting Machine
Distress Ink Festive Berries & Salty Ocean
Art Glitter Bananan
Dimensional Foam Adhesive
Glue Pen