Showing posts with label Fall. Show all posts

Tuesday, November 15, 2016

November 2016 Calendar Page

Here's my calendar page design for this month.


I die-cut felt and burlap using Crafter's Companion Die'sire Mixed Media Dies - Autumn Leaves and Contemporary Hearts die sets. These Mixed Media Dies are ah-mazing! They can be used on a variety of surfaces as they will cut up to 1.4mm deep. Die cutting felt and burlap was a breeze!


I added Stick-It Adhesive to the back of the materials before die-cutting. Then it was simple to just stick the pieces down on the calendar page. A little green crystal rhinestone was the perfect finishing touch.

Have a beautiful day,


Supplies:
Crafter's Companion Die'sire Mixed Media Autumn Leaves Die Set
Crafter's Companion Die'sire Mixed Media Contemporary Hearts Die Set
Gemini Die-cutting Machine
Stick-It Adhesive Sheets
Felt
Burlap
Rhinestone

Friday, October 21, 2016

Grateful

Hello again and Happy Friday!

There's a great sketch challenge over on My Favorite Things Blog this week. Here's my creation:


This is the sketch:
I used the a super cute stamps and dies from the Pure Innocence Collection called Jumping with Joy.  I also used MFT STAX Nested Shapes dies to die-cut the layer panels - Wonky Stitched Rectangles, Stitched Mini Scalloped Rectangle, Stitched Rectangle and Stitched Fishtail Flags.


The green polka dot sweater and beanie are stamped and fussy cut out from My Favorite Things Fun & Frolic Paper Pack. To give the designer paper some extra dimension, I did some shading with the BG3 Spectrum Noir Marker. It really makes a difference!

All the coloring is done with Spectrum Noir Markers as follows:

Skin - FS2, FS3, CR3, TN2
Hair - EB3, GB8, GB4
Pants - GB6, GB4, BG1
Boots - EB5, EB3, GB8, GB4
Pants - GB6, GB4, BG1
Boos - EB5, EB3, GB8, GB4
Scarf - OR3, OR1, GB3
Shirt - GB5, OR1
Leaf - DG3, GG2, DG1, CR7, OR1, GB5, CT4, GB6, GB1
Shading - BG3


I also die-cut the rectangle panel from the Fun & Frolic Paper Pack. Those tiny leaves were my inspiration for the colors and leaf stamps used on my card design.


The sentiment is stamped and heat embossed in white. I also finished the inside of the card.


Seriously...I'm jumpin' with joy at how CUTE this turned out! Soooo happy I played the challenge this week over at My Favorite Things. I'm gonna have to do this more often! My stamps are happy...and so is my heart :)


Have a fun day!


Supplies:
Spectrum Noir Markers
My Favorite Things Pure Innocence - Jumping with Joy Stamp Set

My Favorite Things Pure Innocence - Jumping With Joy Die Set
My Favorite Things Stitched Fishtail Flags STAX
My Favorite Things Stitched Rectangle STAX
My Favorite Things Stitched Mini Scalloped Rectangle STAX
My Favorite Things Wonky Stitched Rectangle STAX
My Favorite Things Fun & Frolic Paper Pack  
My Favorite Things Cardstocks
Memento Tuxedo Black Ink
Distress Inks
Ink Blending Tool
VersaMark Ink Pad
Anti-Static Pouch
White Embossing Powder
Die-Cutting Machine

Heat Embossing Tool
Dimensional Foam Adhesive
Adhesive tape runner

And don't forget to check out all the tutorials and videos over on the Spectrum Noir Blog. It's a great resource for all levels of crafters!


Tuesday, October 11, 2016

October 2016 Calendar Page

Hello Crafty Friends!

Here's my calender page for this month. It turned out sooooo CUTE!


EEEK! I love it!!! I used the Crafter's Companion Halloween Trick or Treating Stamp set.

 
These little trick or treater kids can be used all year long. They would be fun on birthday cards and all sorts of other occasions. I stamped, colored and fussy cut the cute little witch. She is popped up with dimensional foam. The web image is stamped and embossed with Holographic embossing powder. Super sparkly!


To make the black rhinestone stars, I colored crystal stars with the Black Spectrum Noir Marker. The images are colored with Spectrum Noir Markers and Spectrum Noir Sparkle Pens as follows:

Spectrum Noir Markers:
Skin - FS2, FS7, TN2, CR3
Black areas - IG1, IG3, IG5, IG7, IG9
Dress - PL1, PL4, BG6, CT4, OR2, CG3, CG4
Moon - CT2, CT4, GB6
Spider Eyes - CT4
Rhinestone Stars - Black

Spectrum Noir Sparkle Pens:
Moon and Spider Eyes - Moonlight
Shoes, Hat, Wand Stick, Kitty Whiskers - Crystal Clear


I stamped the spider on the page and used a fine tip black marker to extend the web line to the top of the page. Then I stamped the spider again, colored and cut out just the body. If you look real close, you can see the eyes are shinny. I used a Versamark Ink Marker to color in and heat set with clear embossing powder.

Check out all our great design team projects for more inspiration on:

Facebook - Crafter's Companion USA and Spectrum Noir
Instagram - Crafter's Companion USA and Spectrum Noir
Twitter - Crafter's Companion USA and Spectrum Noir
Pinterest - Crafter's Companion USA and SpectrumNoir
Websites - Crafter's Companion USA and Spectrum Noir


Have a fun day!


Supplies:
Crafter's Companion Halloween Trick or Treaters Stamp Set

Spectrum Noir Ultra Smooth Premium White Cardstock
Spectrum Noir Markers
Spectrum Noir Sparkle Pens
Adhesive Tape Runner
Ranger Distress Ink - Twisted Citron
Memento Tuxedo Black Ink
Versafine Black Ink
VersaMark Ink Pad
VersaMark Marker
Black Fine Line Pen
Ranger Holographic Embossing Powder
Anti-Static Powder
Heat Embossing Gun
Dimensional Foam Adhesive
Clear Embossing Powder

Wednesday, October 5, 2016

Halloween Sparkle

Hey everyone! I've got a super fun way of using Spectrum Noir Sparkle Pens along with Spectrum Noir AquaBlend Watercolor Pencils. Check out my tutorial over on the Spectrum Noir Blog.


The shimmer and sparkle of these pens is AH-MAZING! If you haven't tried them yet, you are missing out!


The tutorial also shows you how I made this really cool background.


I used stamps and dies from Crafter's Companion to make this card. Products listed at bottom of blog post.

Head on over to the Spectrum Noir Blog and check out the tutorial for details on making this card project. While you are there, make sure to take a look at all the other great tips, trick, tutorials, challenges and more!

Be sure to check us out over on:
Pinterest
YouTube
Twitter
Facebook


Have a beautiful day!

Suppplies:
Spectrum Noir Sparkle Pens
Spectrum Noir AquaBlend Watercolor Pencils
Crafter's Companion Kraft Cardstock
Crafter's Companion Shimmering Cardstock
Crafter's Companion Halloween Trick or Treating EZ Mount Rubber Stamp Set
Crafter's Companion Die'sire Create-A-Card "Ruth" Die Set
Crafter's Companion Essendtials Circles Die Set
Ranger Ink Blending Tool & Foam
Die-cutting Machine
Heat Embossing Tool
Anti-Static Pouch
VersaMark Ink Pad
Black Pigment Ink Pad
Clear Embossing Powder
Orange Cardstock
Star Sequins
Liquid Adhesive
Dimensional Foam Adhesive

Friday, November 20, 2015

Stamped Watercolor Fall Leaves

Hello friends. I have a card to share today done with a technique I have shared before. Stamping with Spectrum Aqua Watercolor Markers. Its super easy to do, which makes it one of my favorite techniques!


To see the previous step-by-step tutorial on the Spectrum Noir Blog, click HERE.

The Aqua Marker colors I used to stamp the leaves on watercolor cardstock are: Desert, Sepia, Chestnut, Marigold, Gold, Amber, Leaf Green and Moss.


After the stamped leaves were completely dry, I splattered some of the marker ink onto the panel. To do that, I scribbled the marker on my craft sheet and then picked up the color with a wet paintbrush and flicked. To make sure each splattered color didn't bleed with others, I waited for each color do dry before doing the next.


Can you make out the shimmer on the panel? After stamping and embossing the sentiment, I lightly sprayed some Sheer Shimmer Spritz. The panel is layered on Forest Green Shimmering Cardstock from Crafter's Companion. The stamp set I used is also from Crafter's Companion - Sheena A Little Bit Sketchy - Autumn Leaves.

Our design team has shared so many wonderful tutorials and techniques on the Spectrum Noir Blog. Have you had the chance to try any of them? We would love to see what you have done! Don't forghet to visit and subscribe to our Pinterest boards and Facebook Page!


Supplies:
Spectrum Aqua Markers
Spectrum Noir Ultra Smooth Premium White Cardstock

Crafter's Companion Sheena A Little Bit Sketchy - Autumn Leaves Stamp Set
Crafter's Companion Watercolor Cardstock
Crafter's Companion Shimmering Cardstock - Forest Green
Tsukineko Sheer Shimmer Spritz - Sparkle
Twine
Sequins
Black Versafine Ink
Dark Brown Detail Embossing Powder

Saturday, October 31, 2015

Just Be-gauze

Happy Halloween!

Here's a card that can be used for anytime of the year.


This adorable mummy stamp is from My Favorite Things. I colored using an amazing coloring tutorial I found over on the Spectrum Noir Blog called "Sepia Coloring." It's one of the many great tutorials we have available, showing how to use your Spectrum Noir coloring products.

I colored using Spectrum Noir Marker colors as listed in the tutorial

  • Skin - TN3, TN2, TN1, FS2
  • Hair - EB5, EB4, TN5, TN3
  • Mummy Gauze - GB8, EB2, EB1, Blender


I diecut the image, and also diecut another using a dark grey cardstock. I adhered the image to the "shadow" diecut with foam tape. FUN! The strips on the card base are diecut using My Favorite Things Washi Tape Dies and then sponged with Antique Linen Distress Ink.


That's it for today. Time to go pass have some Halloween Fun with the kids!


Supplies:
My Favorite Things - Mummy Stamp Set and Die
My Favorite Things - Washi Tape Die Set
Avery Elle Stitched Rectangle Die
Memento Tuxedo Black
Spectrum Noir Ultra Smooth Premium White Cardstock
A Muse Studio Cardstock
Sequins
Liquid Adhesive
Foam Tape
Diecutting Machine
Ink Blending Tool

Sunday, October 4, 2015

Haunted Cupcake

Time for another fun challenge over at Spectrum Noir! This month our challenge is to use Orange and Gray on your project. Get all the challenge details HERE.

I used my Spectrum Aqua Watercolor Markers a on my project. Isn't this fun! LOL


 I stamped the cupcake on watercolor cardstock and embossed. Then used the following colors to watercolor:
  • Cupcake Frosting - Amber
  • Skulls, Bones and Cake - Slate
  • Cupcake Wrapper - Black
 

I also stamped and cut out a little skull to put on the big headstone next to the sentiment. All the supplies used to make my card are listed at the bottom of the post.

Hope you can join us this month! As always...there are prizes :)

Have a spook-tacular day!


Supplies:
Spectrum Aqua Markers: Amber, Slate and Black
Crafter's Companion Watercolor Cardstock
Stamps - Stampotique and Inkadinkado
Watercolor Brush
VersaFine Black Ink
Ranger Distress Black Soot Ink
VersaMark Ink
Clear Embossing Powder
Crystal Glitter
Orange Peel Stickles
Tim Holtz Graveyard Die
DCWV Halloween Stack Paper
Washi Tape
Bazzill Black Cardstock
A Muse Studio Orange, Slate and Seattle Cardstock
Rhinestones and Sequin
A Muse Studio Orange Ribbon
Dimensional Foam Adhesive
Ink Blending Tool
Heat Embossing Tool
Die-Cutting Machine
Glue Pen

Wednesday, September 30, 2015

Happy Fall

Hello Friends! It's been a over a week since I posted last. YIKES! I was on a special assignment with a tight deadline, so bloggin' had to step aside for a bit.

Here's a card I made for this weeks Fresh Brewed Designs Challenge:
THE GREAT OUTDOORS - Anything that celebrates outdoors. Wildlife, Animals, trees, outdoor scenes, etc. 


I used Fresh Brewed Designs digi images: Fox, Beaver and Bear.  Aren't they soooo cute?!!! The sentiment is also from FBD - Fall (Handwritten). I adore Heather's handwritten sentiments.
 ...and I will continue to nag her about creating sentiments when she draws new images LOL

All the coloring is done with Spectrum Noir Markers: TN2, TN3, TN4, TN6, TN7, EB1, EB2, EB4, EB6, GB7, FS7, DG3, CG2, BG1, BG2, BG3, BG5, BG7, BG9


 After coloring the images, I trimmed and adhered with foam adhesive. They turned out so CUTE! Some fun die-cuts and leaf shaped sequins added great texture. This challenge is open to so many ideas! I had a great time coloring and creating this one.

Get all the challenge details over on the Fresh Brewed Designs Challenge Blog HERE.

BONUS! 
Fresh Brewed Designs has a 20% OFF SALE this week only on Coffee & Fall digi images.


Thanks for stoppin' by!

Supplies:
Fresh Brewed Designs Digi Images
Spectrum Noir Markers
My Favorite Things Dies
Paper Smooches Dies
Lawn Fawn Sequins
A Muse Studio solid cardstocks
Dream Street Papers patterned paper
Twine

Die-cutting Machine
Dimensional Foam Adhesive

Sunday, November 9, 2014

November 2014 Calendar Page

I'm not sure where the time has gone...but I blinked it was November! Here's my calendar page for this month:
 

I used Paper Smooches Autumn Groves stamp set.


I added some texture with Straw Speckles from Judi Kins.  FUN STUFF! Also some glitter on the bird and leaves.

Hope your day is full of blessings :)


Monday, November 3, 2014

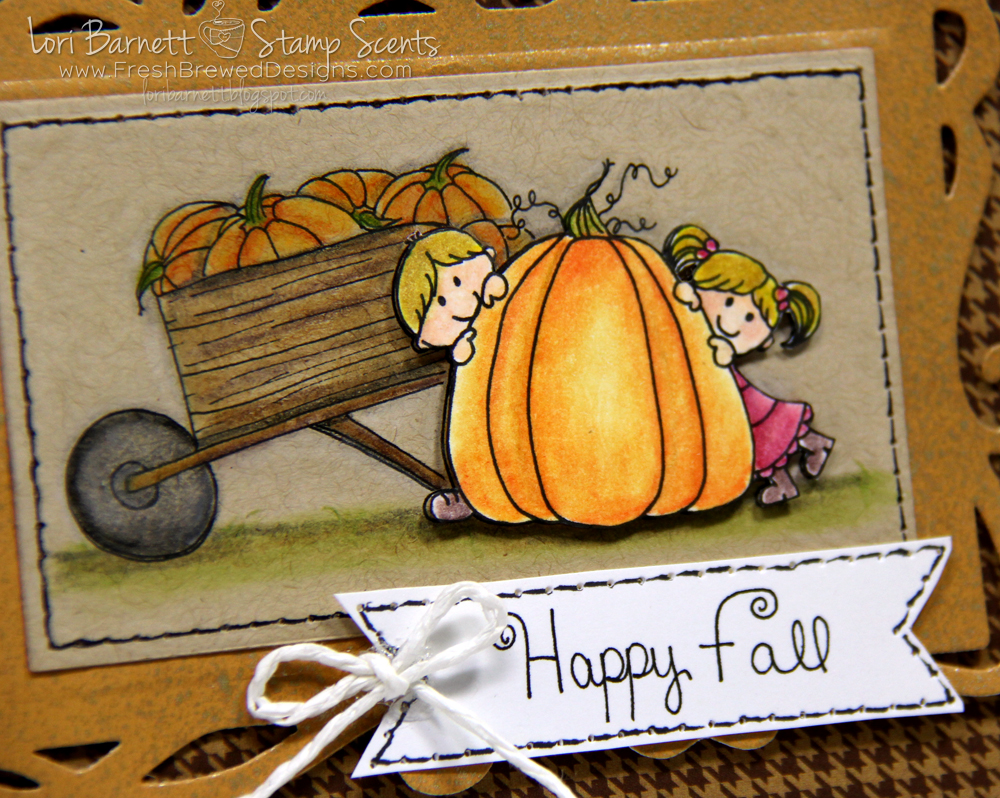
Happy Fall

Today is yet another GREAT release of NEW Digi Images from Fresh Brewed Designs! You can see all the new Fall images and sentiments HERE.

I've used 2 new images and 1 new sentiment on my card - Pumpkin Peekers, Pumpkin Wagon and Happy Fall (Handwritten)


I colored with Spectrum Noir Blendable Colored Pencils. First I printed the wagon and pumpkin peekers on Kraft cardstock -- and the pumpkin peekers again on white cardstock. Then I cut out and popped up on foam adhesive. I layered the main image on a die frame from Crafter's Companoin called Nouveau Stamping Frame. It's da'BOMB!


Aren't these stamps adorable! I just LOVE the sentiment. It's handwritten by Heather!

Make sure to visit the FBD blog to get all the details about the release -- as well as see the great samples from the design team.

Happy Monday!

Saturday, October 25, 2014

Pumpkin Patch Challenge REMINDER

Poppin' in quick to remind you to play along with us over at Fresh Brewed Designs.

Our challenge theme  is "Pumpkin Patch". 
Get all the challenge details and see more fun design team samples HERE.
You  have until the 28th to join the fun...and be in the drawing to win some digi images!

I'm using Give Thanks Pumpkin from Fresh Brewed Designs again.


The image is colored with Spectrum Noir Markers:
Leaves - EB1, EB3
Pumpkin - GB4, GB7, FS9
Stem - GB10


This time I loaded on the bling with rhinestones and glitter cardstock. Can't EVER have enough :)


 Click HERE to see the other card I made using this same digi image.

Thanks for stopping in,

Supplies:
Fresh Brewed Designs Give Thanks Pumpkin digi image
Spectrum Noir Markers  EB1, EB2, GB4, GB7, GB10, FS9
DCWV Fall Papers and Glitter Cardstock
A Muse Studio Onyx Cardstock, Sugar Cardstock
Paper Smooches Leaves 2 Dies
Memory Box Ivy Trellis Die
Studio 18 Rhinestones
Foam Dimensional Adhesive

Friday, October 24, 2014

eBrush Fall Leaves

Today I have another way to use Spectrum Noir markers with a stencil. The eBrush!!!


Isn't it amazing how you can transform a plain white cardstock into a beautiful focal piece for a card! So quick and easy! I sprayed each leaf by masking off the others. Then I ran the panel through my die cutting machine to emboss. Lastly, I sprayed the outer edges with GB8. See where I got a little red over-spray? That's because I didn't get those spots masked off all the way when spraying. I'm totally fine with it ;)

Here's the Spectrum Noir markers I used with the eBrush:
  • Red Leaf - CR6, CR8
  • Yellow Leaf - GB3, OR1
  • Tan Leaf - GB8
  • Green Leaf - DG2, DG4
  • Shading around panel - GB8

Did you seemy post earlier this week using the same markers and stencil - but without the eBrush?  Click HERE to see.

Have a great day!

Supplies:
Spectrum Noir Markers - CR6, CR8, GB3, GB8 OR1, DG2, DG4
eBrush from Crafter's Companion
Stamp - Savvy Stamps
Ink - Memento Luxe Morocco
Stencil - CTMH
Die cutting/Embossing Machine
Cardstock - A Muse Studio, Bazzill
Ribbons/Fiber from my stash
Dimensional Foam Adhesive
Ribbon Hole Slot Punch