Showing posts with label Stamp-It Australia. Show all posts

Friday, July 17, 2015

NEW Edge'ables Fancy Borders from Crafter's Companion USA

Happy Friday all you crafty peeps!

Crafter's Companion USA just released 5 NEW Fancy Borders in the Edge'ables Metal Dies Collection that are gonna BLOW.YOU.AWAY! You're gonna want them all. Yep! That's why CC put together a special bundle deal for you. Check it out HERE.

I designed my project using the NEW Butterfly Dreams Edge'ables Die.


Isn't this great! I love that the dies have both positive and negative details. And the pop-up areas!!! LOVE! The wings are attached...but you can lift them to give even more dimension!

The stamps I used on the inside left panel are from Sheena's A Little Bit Sketchy - The Butterfly Effect. I stamped the butterfly with Memento Tuxedo Black Ink and colored with Spectrum Noir Markers: GG2, GG4, GB1, GB4, GB5, BT2, BT5, BT1, BT2 and the Blender marker. Then I stamped the sentiment images using Memento Pistachio and Teal Zeal, first stamping off on scratch paper to lighten the ink.
 
 
The stamp on the right panel is from a Stamp-It Australia set - Friendship Sentiment. Stamped using Memento Tuxedo Black Ink and Pistachio. I also added some clear sequins.


I die-cut the Butterfly Edge'ables die on the from card panel. The sentiment is stamped with VersaMark ink and heat emboss in white. A few sequin and ribbon tied around - then adhered to card front with dimensional foam adhesive. The other 2 colored cardstock panels are adhered flat.


  • Check out all the great projects that our design teams have made using these new dies HERE.
  • Visit the Pinterest Gallery for even more inspiration HERE.
  • Shop on-line for the new dies HERE.
  • Visit the Crafter's Companion Blog for tutorials, news and other great crafty goodness.

 
I'm working on a tutorial on how I made the pop-out panel on the inside of the card. So stay tuned!

FOLLOW US!
Keep up on all the latest and greatest news:

Thanks for checking in with me today. Have a great weekend!


Supplies:
Crafter's Companion Die'sire Edge'ables Butterfly Dreams Die
Crafter's Companion Sheena A Little Bit Sketchy - The Butterfly Effect
Crafter's Companion Stamp-It Australia - Friendship Sentiment
Spectrum Noir Markers - GG2, GG4, GB1, GB4, GB5, BT2, BT5, BT1, BT2, Blender
Spectrum Noir Ultra Smooth Premium White Cardstock
Tsukineko Memento Dye Inks: Tuxedo Black, Pistachio, Teal Zeal
VersaMark Ink
Detail White Embossing Powder
Colored Cardstocks
Clear Sequin
Ribbon
Dimensional Foam Adhesive
Diecut/Embossing Machine
Heat Embossing Gun
Liquid Adhesive
1/4" Corner Rounder Punch

Friday, May 29, 2015

Create-A-Card for a Friend

TGIF! I'm up bright and early today. Going to watch my daughter's 8th grade promotion ceremony. Today is her last day of Junior High School. Next stop...High School. YIKES

The rest of the day I'm planning on spending in my craft room.  I'll be stamping, coloring, die-cutting...and who knows what else. Just gonna have fun! Will you be crafting today? How about making a card for a friend? Here's one I made using the new Friends Create-A-Card Die from Crafter's Companion USA.


To make this card, I took a piece of orange cardstock (one side orange, other side white) and made a top-fold card base. I die-cut and embossed on the front of the card, then sanded off the raised embossed areas.


Next, I took a 4 1/4" x 5 1/2" panel of white cardstock and stamped the "friend definition" image with green ink. I adhered it flat to the back of die-cut card front. Not only did the stamped panel add dimensional interest, it added extra stability to the card front. The flowers are die cut, embellished with enamel dots and glitter, then popped up with foam tape. The leaves are die cut and embossed, then sponged with green ink.

Create-A-Card dies are so fun! And the cool thing is they are made to fit perfectly on a standard A2 card. But you can do WAY more with them than just a basic card. Go check out all the great projects our design team made in the Inspiration Gallery on the Crafter's Companion USA website HERE and on our Pinterest Board HERE. 

Have a great day full of crafting,


Supplies
Crafter's Companion Friend CAC Word Die
Crafter's Companion Die'sire Classiques Lace Bloom Die
Crafter's Companion Stamp-It Australia Friendship Sentiments Stamp Set
Memento Pistachio Ink
Crystal Glitter
Sanding Block
White Cardstock
A Muse Studio Orange Cardstock
Enamel Dots
Die-cutting/Embossing machine
Dimensional Foam Adhesive

Thursday, January 22, 2015

Stencils with Embossing Paste - Tutorial

Hello friends. As we anxiously await the release of some NEW Sheena Douglass Stencils, coming soon to Crafter's Companion USA, I though I would share a tutorial using a fabulous stencils that is currently available.

The stencil I used is called Summer Meadow. Isn't is amazing?! To get the great texture and colors, I used embossing paste and embossing powder. This technique creates a really cool raised texture that has a beautiful glaze on top.


NOTE: For easy clean up - do this technique on a craft mat.

Instructions:
Tape the stencil on top of Kraft cardstock panel. I used painters tape to temporarily hold the cardstock and stencil in place. This will prevent the stencil (and cardstock) from shifting when applying the paste.

Tip: You don't have to use the entire stencil design. I only used a portion for my card.


Pick up paste with the palette knife and apply it over the stencil - as if you were frosting a cake. I used the Black Matte Embossing Paste from Dreamweaver. It's up to you how thick or evenly you apply it. You really can't go wrong. Scrap off any excess paste and put it back in the container.


Carefully remove the tape and then very carefully lift off the stencil. Isnt' that AMAZING?!


Clean the paste off the stencil RIGHT AWAY or the paste will dry on the stencil.

Tip: I had a container with water and a little dish soap set off to the side. I just put my stencil right in the container so I could continue making my project.


Before the paste starts to dry, generously add embossing powder over the top of the paste. I used Aged Scarlet Embossing Enamel from Stampendous.


Tap off the excess embossing powder and funnel it back into the container.


Set aside the panel to dry. Drying time varies depending on the paste and how thick it was applied. Because the tree area on this design is so large, I suggest at least an hour of drying time.

Once the paste is dry, heat set the embossing powder.


Now it's time to finish the card design with some stamping and shading.

Randomly stamp the Overlapped Text image with Antique Linen Distress Ink.


Sponge Antique Linen, Mustard Seed, Walnut Stain and Aged Mahogany Distress Inks around edges of panel. Wipe off any excess ink that is on the embossed areas with baby wipe or paper towel. Stamp sentiment with black pigment ink and emboss with clear. Mat panel on black cardstock and then on Shimmering Gold Dust Cardstock. Mount to black note card with foam adhesive. Tie black satin cording around edge of card.


The dimension you get from the paste is awesome. Adding embossing powder on top of the paste gives added texture and shine that is out of this world beautiful! I hope you give it a try.

Stay connected over at Crafter's Companion USA Facebook page for updates on products.
https://www.facebook.com/CraftersCompanionUSA?ref=br_tf

Thanks for stoppin by!


Products:
Crafter's Companion Sheena Decorative Stencil - Summer Meadow
Crafter's Companion Stamp-It Australia - Overlapped Text
Crafter's Companion Sheena's A Little Bit Sketchy - Poppies and Daisies (retired)
Crafter's Companion Kraft Cardstock
Crafter's Companion Shimmering Gold Dust Cardstock
Black cardstock
Distress Inks - Antique Linen, Mustard Seed, Walnut Stain, Aged Mahogany
Black Pigment Ink of choice
Dreamweaver Matte Black Embossing Paste
Stampendous! Aged Scarlet Embossing Enamel
Clear Embossing Powder of choice
Palette Knife
Removable Tape/Painters Tape
Heat tool
Ink Sweeper, Sponge Daubers or Blending Foam
Foam Adhesive


Wednesday, December 31, 2014

The secret of staying young...

BLOG HOP BIRTHDAY CELEBRATION!
Join us as we give the ever so talented Design Team Coordinator for Crafter's Companion USA - Kendra Wietstock a big Happy Birthday Wish!
 

Here's the card I made in Kendra's honor..


I stamped all the flower images (Sheena's A Little Bit Sketchy - Bloomin' Beautiful) on high gloss cardstock with Distress Inks - Iced Spruce, Peacock Feathers and Squeezed Lemonade. The sentiment is stamped with Black Archival Ink.  Isnt' that quote great! LOL. It's from Stamp-It Australia Friendship Sentiments set.

Here's the blog hop link list.
Happy Birthday my dear friend Kendra


Wednesday, August 20, 2014

The best thing you can wear...

...is a Smile.

Happy Hump Day everyone! I've got a really cool project today. Hope it makes YOU smile as much as it does me.


I got my idea from 2 tutorials over on the Spectrum Noir Blog. Grid Background and Background Fun with Blender Pen Refill. Go check out those tutorials! Fun and easy ways to use your Spectrum Noir Markers for more than just coloring a stamped image!

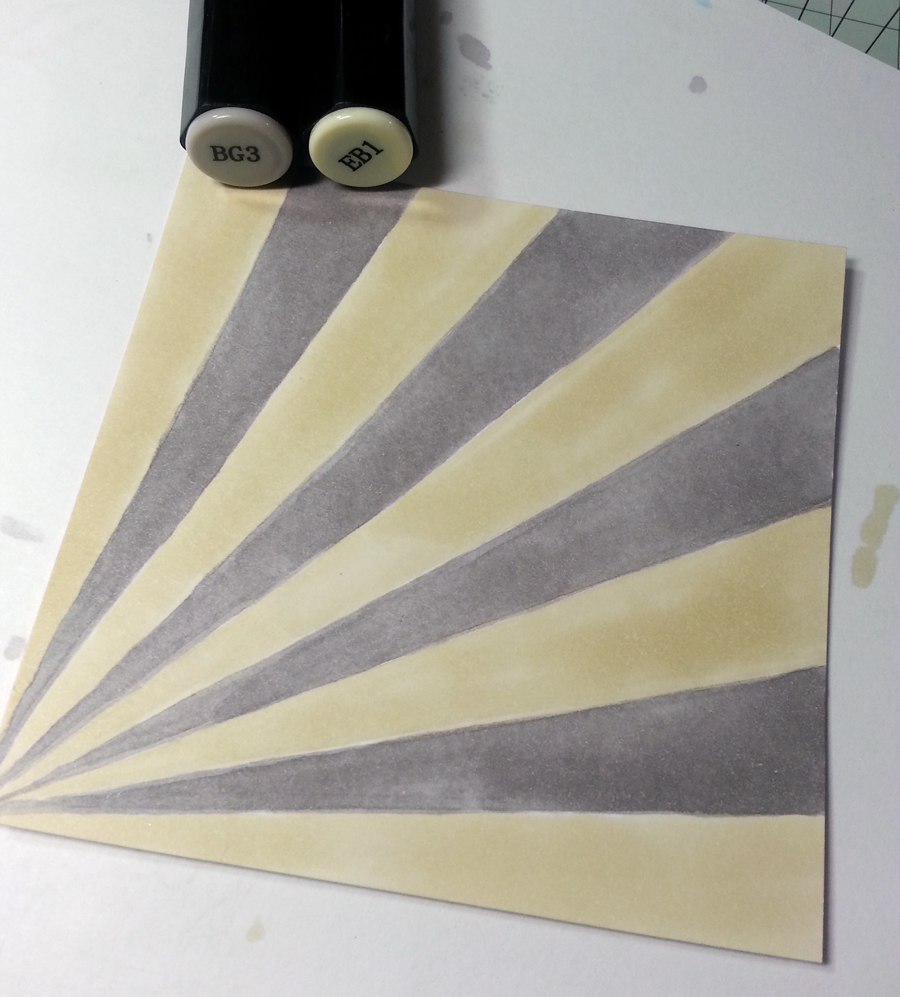
I decided to make angled lines instead of the grid blocks as shown in the tutorials. My paper panel is 4" x 4"

It was super easy to mark off my cardstock panel, using the grid on my cutting mat. I used a couple pieces of washi tape to hold my paper in place. The lines darker than I normally make them...just so you could see in the picture -- but I erased them back to super super light before I started coloring. When YOU do this...draw the lines really light...just enough so you can see 'em.


Next, I colored all the darker sections with BG3. I let them dry before coloring the other sections with EB1. I used the chisel end of the marker. It's easy to get in the tight spots with the chisel simply by turning the angle of the pen.


Here's how it looks all colored in. Then I took my bottle of Spectrum Noir Alcohol Blender Marker Ink Refill and made drips and splatters. Make sure to let the panel completely dry before stamping!


The images are stamped with Memento Luxe Espresso Truffle ink. I love how the sentiment from Crafter's Companion Vintage Collection Sentimentals - Verses set goes perfectly with the vintage camera image from Crafter's Companion Stamp-It Australia Dreamer - Once in a Lifetime set. love love love love LOVE! :)

THEN...I took some tiny chipboard stars from Um WOW Studios and embossed the tops with Ranger Liquid Platinum.
Here's the before picture -- naked chipboard


Pick up the little star with your tweezers -- tap it on a Versamark Ink pad -- dip it in the embossing powder and zap it with the heat gun.
Now we have dressed up chipboard....


Thanks for stopping by today.

I hope you're wearing a smile today!


PS -- Don't forget about the Birthday SALE going on this week over at Crafter's Companion USA! The bargains are SURE to put a grin on your face! And AWESOME prizes are up for grab each day over on Facebook!

Saturday, June 21, 2014

Tags, Boxes and Bags...OH My!

Hello again! I've got a project tutorial to share for Crafter's Companion Monthly Challenge. This month we wanna see some Tag's, Boxes and Bags. Fun...right?! The possibilities are completely endless!!!

I designed a bag AND a tag. :) It's soooo easy to make your own treat and gift bags from plain 'ol paper sacks. I happen to have some mini ones (yes...I've been hoarding them!), but you can do totally do this with any size you've got on hand. Simple and quick...and completely transforms a plain sack into a beautiful gift bag! I did both front and back - but left the sides plain.


Step 1: Stamp flowers on bag with Versamark ink. Embossed with white embossing powder. 

Step 2: Ink "journal page" stamp with light brown ink. Then ink up the center of the flower with yellow ink and the bird with light blue ink. Re-moisten ink on stamp by "huffing" on it - then stamp the image on white cardstock. Sponge Daubers or Mini ink pads work great for this technique!

Step 3: Trim "journal page" image and mat on designer cardstock. Trim as needed.

Step 4: Stamp sentiment on designer cardstock strip. Trim to create banner. Attach with foam tape.

Step 5: Die cut tag from designer cardstock. Attach journal panel with foam tape.

Step 6: Embellish tag with sequins, pearls, flower and ribbons. Attach to bag with clip.


BONUS! Make your own colored ribbon to match any project with Spectrum Noir Markers! Using the chisel end of the marker, simply color the ribbon and let dry. I KNOW! AMAZING!


We would love to see your tags, boxes and bags. Join the challenge and show us your goodies :) You could WIN a $30 Crafter's Companion Voucher! WOOT WOOT!

Get all the June Challenge info. HERE.

Thanks for stopping by :)
Happy 1st Day of Summer!


Supplies used on project:
Crafter's Companion Stamp Sets -  Sheena A Little Bit Sketchy - Poppies and Daisies; Stamp-It Australia Dreamer - Once In A Lifetime
Spectrum Noir Marker - EB3 (Darks set)
Crafter's Companion Ultra Smooth Premium White Cardstock
Doodlebug Designs 6x6 Kraft in Color cardstock pad
Memento Dye Inks - Desert Sand, Dandelion and Summer Sky
StazOn Midi Ink - Spiced Chai
VersaMark Ink
White Embossing Powder
Tim Holtz - Tiny Tabs & Tags Die
Foam Adhesive
Misc. - Sequins, pearl stickers, paper flower, ribbons, string, mini wooden clothespin

Friday, June 20, 2014

Dream a Little Dream

Hey there crafty friends!

I'm STILL having tons of fun playing with watercolors. Have you jumped on the watercolor boat yet? It's completely addicting!

On this card I did a "Stamped Emboss Resist + Watercolor Wash" technique. I stamped the background image from Crafter's Companion Stamp-It Australia Dreamer - Once in a Lifetime set on watercolor cardstock with VersaMark ink and embossed with clear embossing powder. Then I applied a "wash" of watercolor paints. 


I KNEW this stamp would work perfectly for this technique! Isn't it DREAMY! Like....UmWow! Speaking of UmWow...the "flair" button and chipboard stars are from UmWowStudio.com. UmWowStudio is a family owned business specializing in laser cut chipboard elements and masks for the paper crafting and mixed media community. You can check 'em out HERE. They were so kind to offer our design team some of their products to play with. Thank you!

I took the chipboard stars and did a couple layers of white pigment ink -- then added holographic embossing powder. They're absolutely stunning against the background.


I added a few blue rhinestones and some silver cording...then mat the panel on dark purple cardstock. The entire piece is adhered to an ocean blue card base with double-sided adhesive foam.


Have a dreamy weekend :)

Products used on card:
Tim Holtz Watercolor Cardstock
Watercolor Paints
Clear Embossing Powder