Showing posts with label Mini Bags. Show all posts

Sunday, July 9, 2017

Corner Dies

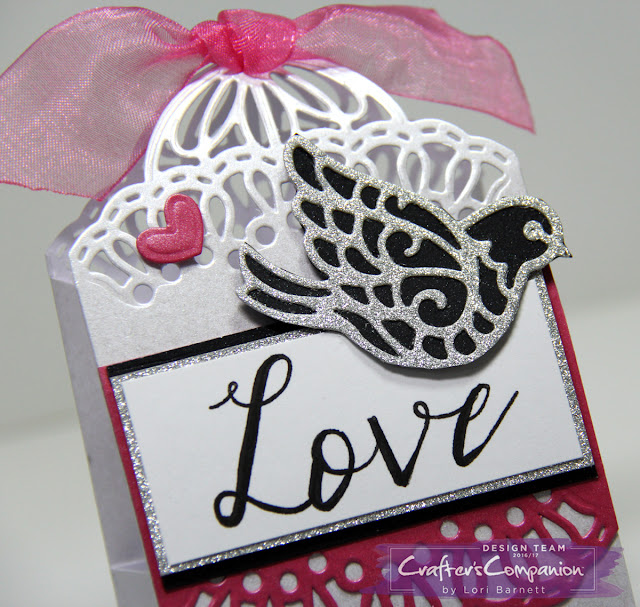
Today popping in quick to share a fun way to use the Crafter's Companion Die'sire Classiques Corner Dies.This is another one of the dies that will be available during the HSN Crafty Event July 11th. For this fun project I used the Doily Corner Die. 


This die worked perfectly to jazz up the top of this DIY box/bag. Then I diec-cut another piece from the Rose Pearl Shimmer cardstock to add to the front.. The bird is actually from the new Feathered Friends Create-A-Card die. I just cut it out of and layered on top of black cardstock.


I used the New Spectrum Noir Artliner Brush Marker to write "Love" and mat it on silver glitter luxury cardstock.

The Hot Pink ribbon is new from the Sara Davies Signature Collection called Glamour. It's amazing!

Dont' forget...
Tuesday July 11th is the big 24hr Craft Event on HSN. You will find these corner dies and more.


While you are waiting for the show date...


Supplies:
Crafter's Companion Die'sire Classiques Corner Die - Doily Corner
Crafter's Companion Die'sire Create-A-Card Dies - Feathered Friends (Cut out the bird and heart)
Crafter's Companion Stamp Set - Alpha Script Uppercase and Lowercase
Crafter's Companion Luxury Cardstock - Silver
Crafter's Companion Glamour Collection - Organza Ribbon - Hot Pink
Crafter's Companion Shimmering Cardstock - Pearl White, Rose Pearl and Black Pearl
Spectrum Noir Ultra Smooth Premium White CS
Spectrum Noir Artliner Pen
Gemini
The Ultimate
Crafter's Companion Adhesive Tape
Collall Glue
Dimensional Foam Adhesive
Black Ink

Saturday, June 21, 2014

Tags, Boxes and Bags...OH My!

Hello again! I've got a project tutorial to share for Crafter's Companion Monthly Challenge. This month we wanna see some Tag's, Boxes and Bags. Fun...right?! The possibilities are completely endless!!!

I designed a bag AND a tag. :) It's soooo easy to make your own treat and gift bags from plain 'ol paper sacks. I happen to have some mini ones (yes...I've been hoarding them!), but you can do totally do this with any size you've got on hand. Simple and quick...and completely transforms a plain sack into a beautiful gift bag! I did both front and back - but left the sides plain.


Step 1: Stamp flowers on bag with Versamark ink. Embossed with white embossing powder. 

Step 2: Ink "journal page" stamp with light brown ink. Then ink up the center of the flower with yellow ink and the bird with light blue ink. Re-moisten ink on stamp by "huffing" on it - then stamp the image on white cardstock. Sponge Daubers or Mini ink pads work great for this technique!

Step 3: Trim "journal page" image and mat on designer cardstock. Trim as needed.

Step 4: Stamp sentiment on designer cardstock strip. Trim to create banner. Attach with foam tape.

Step 5: Die cut tag from designer cardstock. Attach journal panel with foam tape.

Step 6: Embellish tag with sequins, pearls, flower and ribbons. Attach to bag with clip.


BONUS! Make your own colored ribbon to match any project with Spectrum Noir Markers! Using the chisel end of the marker, simply color the ribbon and let dry. I KNOW! AMAZING!


We would love to see your tags, boxes and bags. Join the challenge and show us your goodies :) You could WIN a $30 Crafter's Companion Voucher! WOOT WOOT!

Get all the June Challenge info. HERE.

Thanks for stopping by :)
Happy 1st Day of Summer!


Supplies used on project:
Crafter's Companion Stamp Sets -  Sheena A Little Bit Sketchy - Poppies and Daisies; Stamp-It Australia Dreamer - Once In A Lifetime
Spectrum Noir Marker - EB3 (Darks set)
Crafter's Companion Ultra Smooth Premium White Cardstock
Doodlebug Designs 6x6 Kraft in Color cardstock pad
Memento Dye Inks - Desert Sand, Dandelion and Summer Sky
StazOn Midi Ink - Spiced Chai
VersaMark Ink
White Embossing Powder
Tim Holtz - Tiny Tabs & Tags Die
Foam Adhesive
Misc. - Sequins, pearl stickers, paper flower, ribbons, string, mini wooden clothespin

Tuesday, October 16, 2012

The Candy Monster


We have a Spooky & Sweet challenge for you over on the Our Craft Lounge Blog this week!

Make Fall or Halloween Treats

To turn this plain white paper sack into a Halloween Treat Bag, I used two AWESOME stamp sets from Our Craft Lounge - Spooky Borders and Little Boogas.

 
 LOTS of glitter and shimmer! YEAH BABY!


You can see in the closeups the areas that have Spica glitter pens colored on them - purple spots on the monster, shoes, stripes on socks, kids hair and the suckers on the sack. Spica pens give a nice shimmer. On the monsters eyelids and candy in the pumpkin I used glitter. On the sucker and pumpkin I used Stickles. I colored over the eyeballs with a clear glaze pen.

 
You know...this little monster could be used for a birthday card.  Just don't ink up the pumpkin and sucker.  Then you can replace the sucker with a balloon :) 


Recipe:
Stamps - Our Craft Lounge Spooky Borders and Little Boogas
Inks - Memento Tuxedo Black
Paper - A Muse Studio Sugar; Bazzill black & green
Misc. - Copic Markers YG17 YG67 YR16 V17 T6 W2 0; Spica Glitter Pens, Orange, Lavender, Melon; Sakura Clear Glaze Pen; Glitter Ritz Purple Glitter; Art Glitter Key Lime; Stickles Glitter Glue Orange Peel; Quickie Glue Pen; Martha Stewart Web Punch; Marvy Scalloped Circle Punch; A Muse Studio white paper sacks; 3D Foam Adhesive

Wednesday, September 28, 2011

Eat At Your Own Risk!

Who loves getting treats at Halloween?
Especially when they come in cute little treat bags!

A Muse Studio Brown Paper Bags measure 3" x 1 3/4" x 5 3/4" and come in a pack of 50 for 3.95!!! THUD!
The perfect size....not to BIG...not to small...JUST RIGHT!
 
OH...AND GUESS WHAT...one of the stamp sets I used - If You Dare - is ON SALE!

 
The "happy halloween" sentiment is from the Essential Sentiment set. This set has a stamp for every holiday and occasion you can think of! GIT-R-DONE!  It's also one of the sets that you get in the Deluxe Starter Kit if you sign up to be an A Muse Studio Consultant.  Are ya interested?  Give me a shout!


All supplies for this project are available from A Muse Studio.

Recipe:
Stamps - If You Dare, Essential Sentiments
Papers - Slate, Onyx, Orange
Inks - Sugar & Onyx Pigmet
Misc. - Brown Paper Bags, Big Shot Diecut Machine, Spellbinder Nestabilities Labels 1 set, Onyx Twine, 1 1/2" Circle Punch, Circle Scissor Pro, Glass Mat, 3D Foam Adhesive

Monday, November 23, 2009

House Mouse & Friends Monday Challenge

Hey all you House Mouse lovers! It's time for another Monday challenge.

House Mouse & Friends Monday Challenge # 56 - Double Pocket Bag
Our challenge this week is Janneke's idea. Click HERE for instructions. Create any theme you want...just make sure to include at least 1 House Mouse or Friends image on your project. Click HERE for all the challenge details and design team cards. I also have some sad news...this is Janneke's last challenge with us. We are going to miss her so much! :(

These bags are made with one 12"x12" piece of paper. I used a double-sided patterned paper so the inside looks cute too. I was going to stamp little mouse footprints on the inside -- but totally forgot before I put it all together!

Oh well...next time.


The paper piercing along the top brown piece was quickly done using my Scor-Pal Board & Scor-Bug Embosser. I looooove having cool tools to make the job easier! The cotton ball is covered with White Sparkly Fluff. Doesn't Monica look so sweet sleeping on that cotton ball :)
I added glitter to the flower petals so they are nice and sparkly. To get a border of glitter around the oval - I used a 2-way glue pen with a chisel tip.


Here are a couple shots to give you a better view of the pockets...


You can tuck all sorts of things in these pockets. Pictures, letters, cards in 1 side and envelopes in the other(great gift idea), the possibilities are endless!


Now
is that fun or WHAT!

Recipe:Stamps - House-Mouse Designs Dreampuffs
Paper -
Neenah Classic Crest Solar White; Patterned Paper from Creative Imaginations, LLC The Studio Barn, LLC; A Muse Artstamps French Roast and Popsicle Pink Solid 4-bar notecardsInk - A Muse Artstamps Black Dye Ink
Misc. - Prismacolor Pencils; Gamsol OMS; Blending Stumps; Marvy Uchida Oval and Scalloped Oval Punches; Bazzill Flower;
Scor-Pal and Scor-Bug; Our Craft Lounge Sparkly Fluff - Sugar; Art Glitter Baby's Breath; ribbon from stash; 2-way glue pen; dimensional foam tape

Monday, April 6, 2009

Sweet Little House Mouse

IT'S MONDAY!

Here we are again...Monday morning! Are ya ready for something sweet to start your day? Wellllll.....here's somethin'.......

House Mouse & Friends Monday Challenge #32 - Something Sweet
Make anything you like with something sweet on it! A sweet image, the word 'sweet' in your sentiment, something that you think is sweet, the list is endless. Fun Fun Fun!! And with Easter just a few days away...sweet stuff should be easy :) For all the challenge details and to see creations by the Design Team - click HERE. Hope you can join us this week!

I made a "sweet" little basket for my project. You can find the tutorial for this "Box in a Bag" project HERE. This bag is SUPER SIMPLE and could be used for all sorts of fun sweet things. My basket is filled with Watermelon Flavored Life Savers. yummo!


Hope you have time to make something sweet this week :) Happy Stamping House Mouse Lovers!!

Recipe:
Stamps -
House-Mouse Designs Party Mouse (Monica), Jumpin for Joy; A Muse Artstamps Cupcake set
Paper - A Muse Artstamps Kitchen Green CS; Bazzil Tootsie Bling CS; White CS
Ink -
A Muse Artstamps Black Dye Ink
Misc. -Prismacolor Pencils; Gamsol OMS, Sakura Quickie Glue Pen; Ultrafine Crystal Glitter; EK Success flower punch; Marvy Uchida Scalloped Oval Punchs; Fiskars Threading Water Border Punch; Misc White Brads; Dimensionals

House Mouse & Friends Monday Challenge Blog HERE
House-Mouse Designs Official Website HERE.
Tips on how you can easily color the House-Mouse Stamp Images HERE

Monday, November 24, 2008

House Mouse & Friends Monday Challenge

Crazy for Polka Dots

It's all about Polka Dots!! EVERYONE seems to love and use them. Embossing folders, patterned paper, stamps, ribbon, doodling, brads, buttons.......they are everywhere! So let's get stamping. Just make sure and use at least one House Mouse & Friends stamp on your project. For all the challenge details and to see all the awesome creations the Design Team has come up with click HERE.

My creation is a Mini Treat Bag (pattern from A Muse Art Stamps)


These little treat bags are so fun and easy to make. You can create 2 of them from 1 piece of 8 1/2" x 11" piece of cardstock.


This House Mouse image is called Having A Ball and features Mudpie. Cute little Mudpie has brown fur and a little nick in his ear. He is really lazy and his two favorite activities are eating and sleeping.


I used COPIC markers to color this time. The puffs on the Santa Hat is White Applique sprinkled with glitter. Then I puffed it up with my heat gun.

Recipe:
Stamps - House-Mouse Designs Having A Ball; SU So Many Sayings
Paper - My Mind's Eye Wild Asparagus "Sweet" Dots/Red Paper, Neenah Classic Crest Solar White
Ink - Tsukineko Memento Tuxedo Black
Misc. - Copic Markers; Clear Glaze Pen (on the nose); Scor-Tape; Dimensionals; Sakura Clear Glaze Pen; Marvy Uchida Liquid Applique White; Ultra fine Crystal Glitter; Staedtler Triplus Fineliner 0.3 mm Black Pen; Misc Ribbon; Marvy Uchida Scalloped Circle Punch (blue), EK Success Circle Punch (1.75"); Fiskars Circle Hand Punch; Scor-Pal

House Mouse & Friends Monday Challenge Blog HERE
House-Mouse Designs Official Website HERE.
Tips on how you can easily color the House-Mouse Stamp Images HERE