Hi there! I've got a tutorial over on the Crafter's Companion USA Blog for these super EASY treat boxes. They're so fun to make...and can be designed for any occasion.
The finished cube is 1 1/2" x 1 1/2" - perfect size to hold a Lindt
Lindor Chocolate Truffle. These would make wonderful party favors! You can easily make 3 cubes from one 8 1/2" x 11" sheet of cardstock.
I used Crafter's Companion Shimmering Cardstock for all the pieces. This heavyweight cardstock not only has a beautiful shimmery finish on BOTH sides..but it makes the most STURDY 3D projects -- and is da'bomb for die cutting!
Step-by-step instructions to make this project are over on the Crafter's Companion USA Blog. I hope you hop to check it out and give it a try.
Happy Crafting!
Supplies:
Crafter's Companion - The Ultimate Crafter's Companion
Crafter's Companion - The Boxer Board
Crafter's Companion Shimmering Cardstocks - Pearl White, Rose Pearl, Black Pearl Forest Green
Crafter's Companion Sentimentals EZ Mount Stamp Set - Love is all you need
Crafter's Companion Die'sire Classiques Metal Dies - Forget Me Not
Crafter's Companion Red Liner Tape
Bakers Twine
Black Rhinestone
VersaMark Ink
White Embossing Powder
Embossing Buddy
Dimensional Foam Tape
Heat Embossing Gun
Diecutting/Embossing Machine
Showing posts with label Treat container. Show all posts
Tuesday, February 23, 2016
Friday, April 3, 2015
Carrot Favor
Hello everyone!
Only a couple more days until Easter, so here's a quick project idea for all you last minute crafters - like me! LOL
These little babies can be mass produced in no time! Put them in Easter baskets, set them at each place setting for your Easter meal, put a bunch in a decorative dish or basket, or hand them out to your family and friends.
Here's how:
Emboss a piece of orange cardstock with the Petite Dots embossing folder.
Die-cut scalloped circle from the embossed orange cardstock , using the largest scalloped circle die from the Die'sire Essentials Scalloped Circles set.
Gently curve the scalloped circle to form a cone. Apply liquid adhesive to one edge and hold in place for about a minute, making sure the edges stick together.
Add a strip of double sided tape to the inside of cone. This will secure the cello treat bag in place.
Add candy to clear cello treat bag and tie closed with green ribbon.
Place inside treat container, making sure it sticks to double-sided tape.
Create a fun embellished tag and tie on with green twine.
You can make these any size you want. If you don't have clear cello treat bags handy, just use the corners of sandwich baggies and cut to size. Or use plastic food wrap. The receiver will tear into these for the candy treat, so they won't even notice! LOL!
This tutorial is also shown over on the Crafter's Companion USA Blog. You can see it HERE.
ENABLER ALERT!!!
20% OFF Easter Weekend Sale!!! That's right folks! To celebrate the holiday on April 5th, Crafter's Companion is offering you 20% off all orders until midnight (EST) on Monday! Your discount will be automatically applied at check out. This offer applies on in stock items only, until midnight EST on Monday, April 6th. Retail orders only. Click HERE to start shopping now!
Products used for this project:
Crafter's Companion Die’sire Essentials Die - Scalloped Circles
Crafter's Companion Die’sire Decorative Dies Scalloped Tags
Crafter's Companion Embossalicious 6”x6” Petite Dots Embossing Folder
Bebunni Yum Yum Yum Stamp Set
Kraft Cardstock
Cut’n’boss
VersaMark Ink Pad
Liquid Adhesive
Double-Sided Adhesive Tape
Lime Green Ribbon
Lime Green Twine
Clear Treat Bags
White Embossing Powder
Heat Embossing Tool
Orange Rhinestones
Enjoy and my your day be full of blessings,
Only a couple more days until Easter, so here's a quick project idea for all you last minute crafters - like me! LOL
These little babies can be mass produced in no time! Put them in Easter baskets, set them at each place setting for your Easter meal, put a bunch in a decorative dish or basket, or hand them out to your family and friends.
Here's how:
Emboss a piece of orange cardstock with the Petite Dots embossing folder.
Die-cut scalloped circle from the embossed orange cardstock , using the largest scalloped circle die from the Die'sire Essentials Scalloped Circles set.
Gently curve the scalloped circle to form a cone. Apply liquid adhesive to one edge and hold in place for about a minute, making sure the edges stick together.
Add a strip of double sided tape to the inside of cone. This will secure the cello treat bag in place.
Add candy to clear cello treat bag and tie closed with green ribbon.
Place inside treat container, making sure it sticks to double-sided tape.
Create a fun embellished tag and tie on with green twine.
You can make these any size you want. If you don't have clear cello treat bags handy, just use the corners of sandwich baggies and cut to size. Or use plastic food wrap. The receiver will tear into these for the candy treat, so they won't even notice! LOL!
This tutorial is also shown over on the Crafter's Companion USA Blog. You can see it HERE.
20% OFF Easter Weekend Sale!!! That's right folks! To celebrate the holiday on April 5th, Crafter's Companion is offering you 20% off all orders until midnight (EST) on Monday! Your discount will be automatically applied at check out. This offer applies on in stock items only, until midnight EST on Monday, April 6th. Retail orders only. Click HERE to start shopping now!
Products used for this project:
Crafter's Companion Die’sire Essentials Die - Scalloped Circles
Crafter's Companion Die’sire Decorative Dies Scalloped Tags
Crafter's Companion Embossalicious 6”x6” Petite Dots Embossing Folder
Bebunni Yum Yum Yum Stamp Set
Kraft Cardstock
Cut’n’boss
VersaMark Ink Pad
Liquid Adhesive
Double-Sided Adhesive Tape
Lime Green Ribbon
Lime Green Twine
Clear Treat Bags
White Embossing Powder
Heat Embossing Tool
Orange Rhinestones
Enjoy and my your day be full of blessings,
Labels:
Bebunni,
Crafter's Companion,
Die'sire,
Easter,
Embossing,
Treat container,
Tutorial
1 Comments
Sunday, November 30, 2014
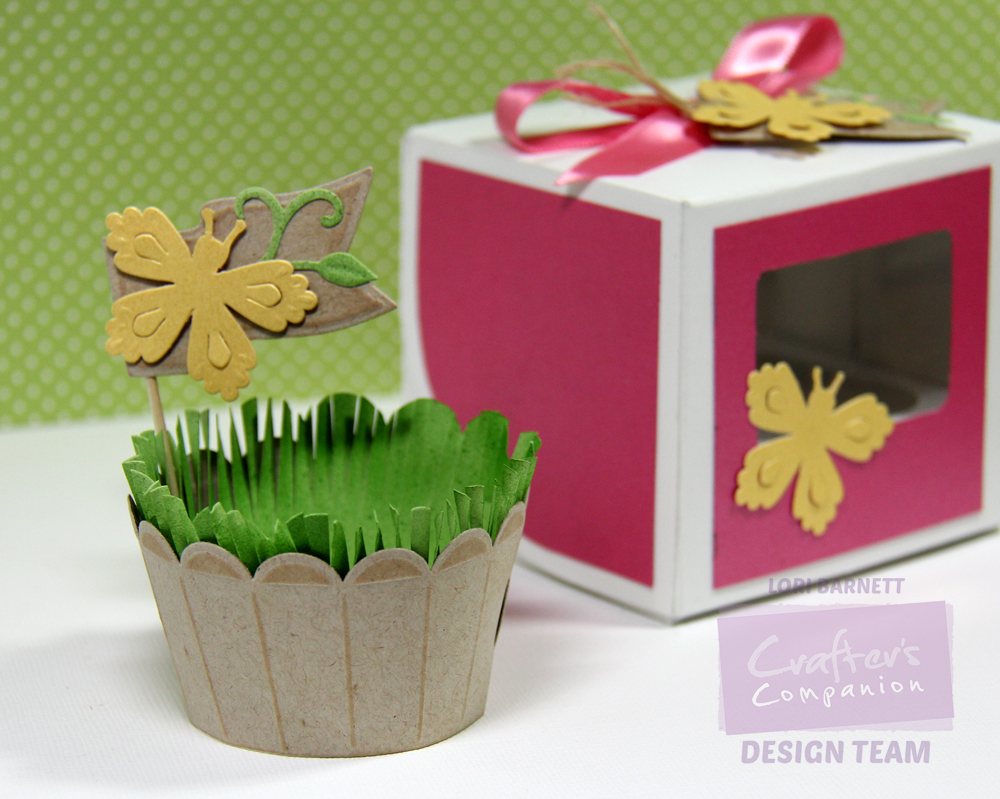
Window Cupcake Box
Hi everyone! I have another Crafter's Companion USA project to share :)

This time I made use of the matting and layering markings on the box template to make an acetate window and side panels from Rose Pearl Shimmering Cardstock. Really fun!
I also used the Lace Bloom 3D Flower Die with Yellow Pearl Shimmering Cardstock to make a butterfly. All I did was trim one of the flower petals.
***STAY TUNED on the Crafter's Companion Blog for my tutorial on how to make the cupcake wrapper with grass!***
Once again...thanks so much for stopping by :)
Hugs,
Once again I'm using the Single Cupcake Presentation Box Template along with the Scalloped Cupcake Wrapper Die, Cupcake Insert Die - Flag and Lace Bloom 3D Flower Die.

This time I made use of the matting and layering markings on the box template to make an acetate window and side panels from Rose Pearl Shimmering Cardstock. Really fun!
I also used the Lace Bloom 3D Flower Die with Yellow Pearl Shimmering Cardstock to make a butterfly. All I did was trim one of the flower petals.
***STAY TUNED on the Crafter's Companion Blog for my tutorial on how to make the cupcake wrapper with grass!***
Once again...thanks so much for stopping by :)
Hugs,
Friday, November 28, 2014
Sugar and Spice for Black Friday
Hello friends! I hope you had a wonderful Thanksgiving Day yesterday. I had a great day spending time with some of my family...and of course yummy food.
Today we have more NEW sweet goodies being featured at Crafter's Companion USA. I've been hard at work thinking of ideas on how to use the NEW Scalloped Cupcake Wrapper. I don't know about you...but I love finding ways to use things for more than they were intended. Here's something really simple that I came up...but I gotta share a little story about how it came to be...
So I jumped in my car and headed to a local cupcake shop -- which I had never been to. I wanted to buy a few yummy cupcakes to use when taking pics of my projects. I had visions of beautiful cupcakes wrapped in my paper crafting and packaged in the most perfect little cupcake boxes. It was gonna be AWESOME! I get to the place...walk in...and I was hit with an instant "SERIOUSLY?!" UUUGH! These cupcakes were BIG. Not the standard size we make at home. I almost walked empty handed....but I though maybe I would try to cut them down and make 'em smaller. (That would have been a sight! LOL) OK...so I get home and start designing my projects. Sure enough...those suckers didn't fit. I sat there thinking....thinking....thinking....THEN...it HIT ME! Put 2 wrappers together!
It worked PERFECT! Easy peasy lemon squeezy! (yes...that's lemon cake ;)
Here's how:
Die-cut and emboss 2 wrappers.
Fold at creases like this...then attach the ends together.
Here's a yummy coconut cupcake. How could I resist ;) Totally makes the cupcake looks extra extra special!
I used the new Rose Pearl Shimmering 8" x 8" Cardstock to make these wrappers. The little flag comes in the NEW Cupcake Insert Flag die set. It's die-cut and embossed from a scrap piece of the new Construction Cardtsock. The sentiment is from Crafter's Companion Vintage Floral Collection Sentimentals and stamped with StazOn Midi Emerald City. I have several other fun projects to share in the coming days. These new dies and templates will be getting a LOT of use in my house :)
DON'T FORGET to check out all the GREAT Black Friday Deals we have going on at Crafter's Companion USA!
Have a safe and fun Black Friday
Today we have more NEW sweet goodies being featured at Crafter's Companion USA. I've been hard at work thinking of ideas on how to use the NEW Scalloped Cupcake Wrapper. I don't know about you...but I love finding ways to use things for more than they were intended. Here's something really simple that I came up...but I gotta share a little story about how it came to be...
So I jumped in my car and headed to a local cupcake shop -- which I had never been to. I wanted to buy a few yummy cupcakes to use when taking pics of my projects. I had visions of beautiful cupcakes wrapped in my paper crafting and packaged in the most perfect little cupcake boxes. It was gonna be AWESOME! I get to the place...walk in...and I was hit with an instant "SERIOUSLY?!" UUUGH! These cupcakes were BIG. Not the standard size we make at home. I almost walked empty handed....but I though maybe I would try to cut them down and make 'em smaller. (That would have been a sight! LOL) OK...so I get home and start designing my projects. Sure enough...those suckers didn't fit. I sat there thinking....thinking....thinking....THEN...it HIT ME! Put 2 wrappers together!
It worked PERFECT! Easy peasy lemon squeezy! (yes...that's lemon cake ;)
Here's how:
Die-cut and emboss 2 wrappers.
Fold at creases like this...then attach the ends together.
Here's a yummy coconut cupcake. How could I resist ;) Totally makes the cupcake looks extra extra special!
I used the new Rose Pearl Shimmering 8" x 8" Cardstock to make these wrappers. The little flag comes in the NEW Cupcake Insert Flag die set. It's die-cut and embossed from a scrap piece of the new Construction Cardtsock. The sentiment is from Crafter's Companion Vintage Floral Collection Sentimentals and stamped with StazOn Midi Emerald City. I have several other fun projects to share in the coming days. These new dies and templates will be getting a LOT of use in my house :)
DON'T FORGET to check out all the GREAT Black Friday Deals we have going on at Crafter's Companion USA!
Have a safe and fun Black Friday
Thursday, October 30, 2014
Figgy Pudding
I don't know about you...but I would welcome ANY sweet treat in this goodie bag!
Have you seen the NEW Moonbeam Meadows Christmas Collection from Crafter's Companion? HELLO! CUTE OVERLOAD! Go check out all the Moonbeam Meadows stamp sets HERE.
These stamps are from the Festive Cheer set and colored with Spectrum Noir Markers. I made a green tag embossed with Crafter's Companion Petite Dot Embossing folder. The red doily is diecut from Crafter's Companion Doilies Die set. I folded it over the top of the bag and stapled it shut. Isn't it perfect?! I've also added crystal lacquer and glitter accents.
Thanks for stopping by today!
Supplies:
Moonbeam Meadows - Festive Cheer
Spectrum Noir Markers: TN1, TN2, TN5 FS3, CT1, CT2, CT4, IG1, EB1, EB3, EB6, EB8, GB7, GB8, PP3, DR2, DR6, CG1, DG3, Blender
Spectrum Noir Ultra Smooth Premium White Cardstock
Des'ire Decorative Dies Doilies
Petite Dot Embossing Folder
Memento Tuxedo Black Dye Ink
Red Woodgrain Cardstock - A Muse Studio
Green and Red Solid Cardstock - Bazzill
White Eyelet
Hole punch
Natural Clothes Pin
Ribbons and paper twine from May Arts
Crystal Glitter
3D Crystal Lacquer
Glue Pen
Double Sided Foam Adhesive
Eyelet Setter
Embossing/Die Cutting Machine
Corner Rounder Punch
Stapler
Have you seen the NEW Moonbeam Meadows Christmas Collection from Crafter's Companion? HELLO! CUTE OVERLOAD! Go check out all the Moonbeam Meadows stamp sets HERE.
These stamps are from the Festive Cheer set and colored with Spectrum Noir Markers. I made a green tag embossed with Crafter's Companion Petite Dot Embossing folder. The red doily is diecut from Crafter's Companion Doilies Die set. I folded it over the top of the bag and stapled it shut. Isn't it perfect?! I've also added crystal lacquer and glitter accents.
Thanks for stopping by today!
Supplies:
Moonbeam Meadows - Festive Cheer
Spectrum Noir Markers: TN1, TN2, TN5 FS3, CT1, CT2, CT4, IG1, EB1, EB3, EB6, EB8, GB7, GB8, PP3, DR2, DR6, CG1, DG3, Blender
Spectrum Noir Ultra Smooth Premium White Cardstock
Des'ire Decorative Dies Doilies
Petite Dot Embossing Folder
Memento Tuxedo Black Dye Ink
Red Woodgrain Cardstock - A Muse Studio
Green and Red Solid Cardstock - Bazzill
White Eyelet
Hole punch
Natural Clothes Pin
Ribbons and paper twine from May Arts
Crystal Glitter
3D Crystal Lacquer
Glue Pen
Double Sided Foam Adhesive
Eyelet Setter
Embossing/Die Cutting Machine
Corner Rounder Punch
Stapler
Monday, October 20, 2014
Birthday Gable Box
It's Birthday Celebration Week at Crafter's Companion USA!
Crafter's Companion USA is celebrating the 9th Birthday of Crafter's Companion UK, their sister company in the UK, in style, with a week of crafty heaven! They've put together fabulous offers, FREE Continental US shipping and DOUBLE Loyalty Points on all orders throughout the week plus you'll get a FREE gift with every order over $25! Click HERE to view all the Birthday Week Offers.
Here's a fun Birthday Gable Box I created using the Sweet Things Ultimate Embossing Board from Crafter's Companion.
The box is made from a 12" x 12" piece of Kraft Cardstock. All the papers and embellishments -- except for the ribbons of course ;) -- are printed from the Sweet Treats PDF Papercrafting CD-ROM.
Isn't this just SO FUN! I love making fun boxed and 3D projects with paper! You could stamp and do all sorts of other fun things if you wanted to. I did everything completely from the board and CD-Rom.
I added crystal glitter to the edges of several pieces. That really gives it a fun festive look! Not to mention I LOVE to put glitter on EVERYTHING! LOL!
Now go check out all the GREAT DEALS and Freebie stuff you can get with your orders!!!
MEGA GIVEAWAY ALERT!!! Enter the Birthday Celebration Mega Giveaway HERE on the Crafter's Companion USA Facebook Page.
*****************************************************
Check back with me on my blog tomorrow (Tues. Oct 21st) for a SPECIAL Crafter's Companion Birthday Celebration Treat! You won't wanna miss it ;)
Cheers!
Crafter's Companion USA is celebrating the 9th Birthday of Crafter's Companion UK, their sister company in the UK, in style, with a week of crafty heaven! They've put together fabulous offers, FREE Continental US shipping and DOUBLE Loyalty Points on all orders throughout the week plus you'll get a FREE gift with every order over $25! Click HERE to view all the Birthday Week Offers.
Here's a fun Birthday Gable Box I created using the Sweet Things Ultimate Embossing Board from Crafter's Companion.
The box is made from a 12" x 12" piece of Kraft Cardstock. All the papers and embellishments -- except for the ribbons of course ;) -- are printed from the Sweet Treats PDF Papercrafting CD-ROM.
Isn't this just SO FUN! I love making fun boxed and 3D projects with paper! You could stamp and do all sorts of other fun things if you wanted to. I did everything completely from the board and CD-Rom.
I added crystal glitter to the edges of several pieces. That really gives it a fun festive look! Not to mention I LOVE to put glitter on EVERYTHING! LOL!
Now go check out all the GREAT DEALS and Freebie stuff you can get with your orders!!!
MEGA GIVEAWAY ALERT!!! Enter the Birthday Celebration Mega Giveaway HERE on the Crafter's Companion USA Facebook Page.
*****************************************************
Check back with me on my blog tomorrow (Tues. Oct 21st) for a SPECIAL Crafter's Companion Birthday Celebration Treat! You won't wanna miss it ;)
Cheers!
Wednesday, September 3, 2014
Witch Hat Treat Box
I LOVE making treat containers! I also love figuring out how to get the most bang out of my buck when using specialty papers. Well... today I'm sharing a little of BOTH. I've designed the most adorable Witch Hat Treat Box using 1 sheet of Crafter's Companion 6" x 6" Shimmering Black Pearl Cardstock to make TWO boxes! I've also used 2 of the NEW Halloween Stamp Sets from Crafter's Companion - which will be available TOMORROW - Thursday Sept 4th!!! Sooo much fun stuff going on around here I can hardly container myself! LOL

First...let me tell you a little about the Shimmering Cardstock. This specialty cardstock is the BEST! It scores absolutely wonderful and makes the best boxes imaginable! It's so sturdy you can pile the treat containers all in a big bucket or bowl and not worry about 'em getting all bent up or crushed! So check this out... One package of 20 sheets is $6.95. You can make 80 high quality treat containers from 1 package!!! That's right....EIGHTY! Awesome huh!?!
Supplies:
- Crafter's Companion 6" x 6" Black Pearl Shimmering Cardstock
- Scoring tool - I'm using The Ultimate Crafter's Companion
- Crafter's Companion Happy Haunting Stamp Set
- Crafter's Companion Best Witches Stamp Set
- Radiant Neon Electric Purple Ink Pad
- Versamark Ink Pad
- Double-Sided Adhesive Tape
- Orange and White Cardstock Scraps
- White Embossing Powder
- Anti-Static Pouch
- Heat Embossing Gun
- Purple Microfine Glitter
- Misc Ribbon, Bakers Twine, etc.
- Button
- Hole Punch
Box Instructions:
Cut 2 - 2 1/2" strips from the 6" x 6" sheet of Black Pear Shimmer cardstock. You'll be left with a 1" x 6" strip - which will be used for the hat brims. The 2 1/2" strips are for the boxes.
Score the 2 1/2" strips in half -- at 3". I used my Ultimate Crafter's Companion board and scored at the "Gatefold 12x12" line -- with the short end of the strip butt up against the top sidebar.
Next, we need to make a "marker notch" at the center (1 1/4") of each end. To do this on my Ultimate board, I simply place my paper between the Gatefold 12x12 line and Half-Fold US Letter line, and make the notches using the Half-Fold 1/2 US Letter line.
Here's what I mean by a "notch".
Now we need to score from the "notch" to the "half fold score line". Simply position the cardstock diagonally on any groove line -- from the "notch" to the "half fold score line" -- and score to join the lines. See sample picture.
Do the same thing on the other 3 corners of the strip.
Here's what it will look like once all the scoring is done:
Prep the cardstock with anti-static powder. This is important to keep stray bits of white embossing powder from sticking where you don't want it. Stamp the spider image with Versamark ink and heat emboss with white embossing powder. When cooled, brush away the anti-static powder.
Fold the cardstock in half at the score line - then punch holes as shown in picture.
Fold in the sides at the score lines to form the wedge box. Check your punched holes to make sure they are lined up enough to string ribbon through. The holes don't need to be perfectly lined up. If needed...you can re-punch any of the individual holes to adjust. TIP: If you end up having to re-punch hole(s) - just have those flaps folded to the inside so they don't show.

NOTE: This box is not assembled using any adhesive tape or glue. Once you place the goodies inside the box, fold the edges over, thread the ribbon through the holes and tie. That will keep the box closed. If you tape the sides shut - the box will have to be torn open to get inside.
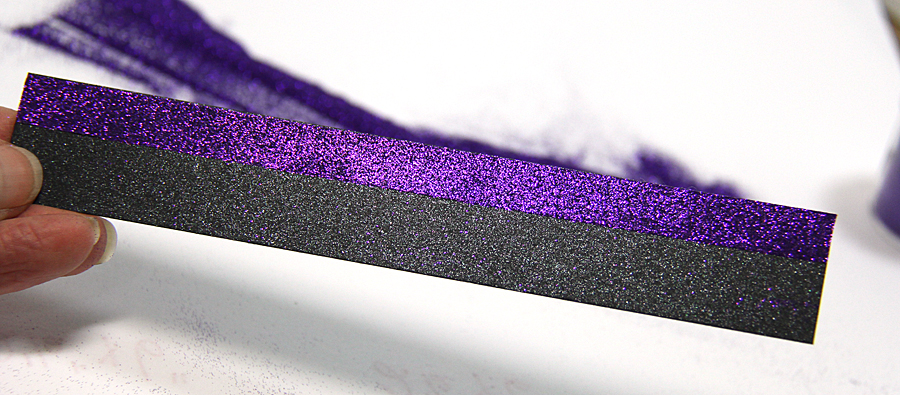
Next comes the hat brim. Apply a strip of double-sided adhesive tape on the long edge of the 1" Shimmer Black Pearl cardstock strip.
Peel off the tapes protective backing and cover the tape with purple glitter. TIP: Burnish (rub) the glitter with your finger to make sure it sticks really well and covers all the sticky tape.
Cut the strip in half. Now you'll have two strips that measure 1" x 3" each.
Trim the ends diagonally. Embellish as desired. I added a thin strip of orange cardstock, orange rhinestones and a green button threaded with black & white bakers twine. Adhere to treat box with double-sided adhesive tape or glue.
To create the sentiment tags, stamp the sentiment on white cardstock with Radiant Neon Purple Ink. Trimmed each word and adhered to orange tags. The orange tags I cut out by hand and punched holes. Tie tags to the treat box.
That's it! I hope I've inspired you to go have some fun with your stamps and cardstock. Don't forget to check out all the NEW Crafter's Companions Halloween products on the website TOMORROW!!!! YAY!
Have a funtastic day!
Subscribe to:
Posts (Atom)