Showing posts with label Vintage Sentimentals. Show all posts

Saturday, October 17, 2015

Slip Box Easel Card

Hello there crafty friends. Hope you are having a wonderful weekend so far. I've got another cool project to share today.
 

This is another creation I made for the last HSN show featuring Crafter's Companion Ultimate Tool and Timeless Card Pack. Here's the project on the tv screen that I snapped a pic of...


This is how the box looks with the easel card folded all the way down.


It's a wonderful gift box and card all in one. The card is attached to the top of the box, which then folds up to an easel card. Using Ivory Pearl Shimmering Cardstock, I diecut to top of the card with Crafter's Companion USA Die'sire Edge'ables - Renaissance Die.


  In the drawer, to create a space for a few greeting cards and a pen, I added a divider.


The box and card die-cut panels are made using the Timeless Card Pack.


All the sentiments are from the same stamp set - Vintage Floral Collection - Sentimentals. They are stamped and heat embossed on Scalloped Ovals that were die-cut from Pearl Ivory Shimmering Cardstock. Simple and elegant.


This box card could be used for all sorts of different gift giving ideas, maybe a mini photo album tucked in the drawer or even candy and other treats.

Click HERE for more projects ideas and inspiration using The Ultimate Tool as well as the fantastic Big Score Board. We also have TONS of projects on Pinterest and are constantly sharing on Facebook.

Have a great weekend!


Supplies:
Timeless Card Pack 11x17
Shimmering Cardstock - Pearl Ivory
White Notecards
The Ultimate Tool
Die'sire Edge'ables - Renaissance Die
Die'sire Essentials - Heart Die Set
Die'sire Essentials - Scalloped Ovals Die Set Vintage Floral Collection - Sentimentals Stamp Set
Collall Glue
Die-cutting/Embossing Machine
Hole Puncher
Brad
Ribbons
VersaMark Ink
Embossing Powder
Heat Embossing Tool
Dimensional Foam Adhesive

Friday, September 18, 2015

Die'sire Faux Letterpress

Hello crafty friends! I've got a fun tutorial to share over on the Crafter's Companion USA Blog. I know you will LOVE this Faux Letterpress technique. As usual, it's super easy. All you CAS lovers will want to give this a try!


I used the new Joy Die from the Die'sire Prestige Christmas Only Words Collection. The detail is simply beautiful! And check out the Candy Red and Black Pearl Shimmering Cardstock. I LOVE that paper!


So hop on over to the Crafter's Companion USA Information Blog to see my tutorial with all the details for the "faux letterpress technique" and directions on making this card. I hope you enjoy :)

http://crafterscompanion.blogspot.com/2015/09/tutorial-faux-letterpress.html


Have a wonderful day!


Supplies:
Crafter's Companion USA Die'sire Prestige Christmas Only Words - Joy Die
Crafter's Companion USA Vintage Christmas Collection Sentimentals - Season's Greetings
Crafter's Companion USA Shimmering Cardstock Candy Red
Crafter's Companion USA Shimmering Cardstock Black Pearl
Crafter's Companion Watercolor Cardstock
Spectrum Noir Ultrasmooth Premium White Cardstock
Collall All Purpose Glue
Memento Dye Ink - Rhubarb Stalk
Memento Dye Ink - Tuxedo Black
Memento Tuxedo Black Marker
Dimensional Foam Adhesive
Black Sequins
Die-cutting/Embossing Machine
Detail Scissors

Tuesday, September 8, 2015

NEW O' Holy Night Edge'able

YAY! More NEW Edg'ables over at Crafter's Companion USA! Christmas goodies galore. I'm totally lovin' all the wonderful new products CCUSA has been releasing - especially all the dies.

Here's a card I made using the NEW Die'sire Edge'ables Christmas Only Words - O' Holy Night die


Using white cardstock, I die-cut and embossed the word border die. To add the black embossed areas, I left the paper in the die and colored them with a VersaMark Marker, Next, I went over the same areas with a Memento Tuxedo Black Marker, then carefully removed the paper from the die, sprinkled on the clear embossing powder and heat set.

This new word border die works together perfectly with the O' Holy Night Create-A-Card die from the new Die'sire Create-A-Card Christmas Collection. The sentiment is stamped and embossed on a die-cut star with crushed glass glitter around the edges.

Using Kraft Cardstock, I die-cut and embossed the CAC die twice from. With the die left in place, I used it as a stencil to apply the white ink. The ink really brings out the details of embossed areas.  On one of the panels, I cut the off trees and arch, then popped up that piece with foam adhesive tape on top of the full cut out piece. The Edge'ables border is popped up on top of all that, with crushed glass glitter underneath.


The card base is black cardstock sprayed with Sheer Shimmer Spritz. The stamped rays, from the Textures Artist Collection - Walls and Corners stamp set, are embossed with Ranger Liquid Platinum Embossing Powder. I die-cutting some stars using the CAC die and Gold Dust Shimmering Cardstock. Three of the stars are adhered over baby Jesus, 4 more are at the top of the card.


Inside the card, I stamped the rays with Desert Sand Memento dye ink. The sentiment is stamped and embossed. The angel is a die-cut from the CAC die using the Gold Dust Shimmering Cardstock, then embossed with Liquid Platinum EP.  I really love how this card turned out.

Get in on some special deals during the launch of the new products HERE.

Check out all the great projects the design team made on the Crafter's Companion USA Pinterest Board.

Have a wonderful day,


Supplies:
Crafter's Companion USA Die'sire Edge'ables Christmas Only Words - O' Holy Night die
Crafter's Companion USA Die'sire CAC Christmas Collection - O' Holy Night die
Crafter's Companion USA Die'sire Essentials - Stars die set
Crafter's Companion USA Vintage Christmas Collection Sentimentals - Family and Friends Stamp Set
Crafter's Companion USA Textures Artist Collection - Walls and Corners Stamp Set
Crafter's Companion USA Shimmering Cardstock - Gold Dust
Crafter's Companion USA Kraft Cardstock
Spectrum Noir Ultra Smooth Premium White Cardstock
Black Cardstock
Tsukineko Sheer Shimmer Spritz
Memento Ink Pad - Desert Sand
VersaMark Ink Pad
VersaMark Marker
Memento Black Marker
VersaFine Onyx Black Ink Pad
Colorbox Chalk Ink Pad - Popcorn
Clear Embossing Powder
Ranger Liquid Platinum Embossing Powder
Fran-tage Champagne Crushed Glass Glitter
Cut'N'Boss Die-Cutting/Embossing Machine
Heat Embossing Gun
Liquid Adhesive
Dimensional Foam Tape

Wednesday, August 12, 2015

Christmas CAC Sneak Peek

WOW! Wait till you see the Christmas Create-A-Card A2 Dies we have coming out later this week at Crafter's Companion USA.

Here's a sneak peek...


This NEW CAC Christmas Die is called We Three Kings. It's beyond amazing!

I diecut and embossed 2 layers - 1 using Crafter's Companion Black Pearl Shimmering Cardstock, the other from a gray cardstock. After cutting and embossing the grey cardstock, I left the paper in the die and used a sponge dauber to sponged on Memento Gray Flannel Ink. Next, I trimmed off the areas I didn't want and lightly sponged the Gray Ink around all the edges - then mounted with foam adhesive. I love how it turned out!

To get the white stars, I diecut the top portion of the die with white cardstock. The sentiment, from the Vintage Christmas Collection Sentimentals Season's Greetings Stamp Set, is stamped and embossed. I also stamped another greeting on the inside of the card. It says "Enjoy the Spirit of the Season" (from the same stamp set)


For the background, I airbrushed with Spectrum Noir Markers EB6 and TB8 on a piece of Kraft Cardstock. It turned out exactly like I planned. (Imagine that! LOL)

I used a beautiful piece of paper from the Vintage Christmas Collection 6"x6" paper pad on the card base, lightly sponged the edges with Vintage Photo Distress Ink. The card card base is 5 1/2" x 5 1/2" and the CAC Die part is 4 1/4" x 5 1/2".

Go check out more sneak peeks of the NEW CAC Christmas Dies over on the Crafter's Companion USA Facebook Page.

Have a great day!


Supplies:
Crafter's Companion CAC Christmas Collection - We Three Kings
Crafter's Companion Vintage Christmas Collection Sentimentals Season's Greetings Stamp Set
Crafter's Companion Shimmering Black Pearl Cardstock
Crafter's Companion Vintage Christmas Collection 6x6 paper pad
Crafter's Companion Kraft Cardstock
White Cardstock
Spectrum Noir Markers
Craftwell eBrush
Memento Gray Flannel Ink
Distress Ink Vintage Photo
Black Pigment Ink
Clear Embossing Powder
Crystal Glitter
Foam Adhesive
Sponge Dauber
Black Ribbon
Cut'N'Boss machine
Heat Embossing Gun

Thursday, June 18, 2015

On your Special Day

Here's a card that just makes me happy. It's made using one of the new Edge'ables Only Words Dies from Crafter's Companion - On Your Special Day.


These dies work perfectly on a diagonal. The white layer underneath is stamped and embossed in white using a sentiment from the Vintage Floral Stamp Set - Sentimentals.

After adhering the blue die-cut piece to the white panel, I added microfine glitter to fill in the letters.


The little butterflies are from Crafter's Companion Bebunni Floral Butterfly & Bee die set. These butterflies are the perfect size for so many designs! Some black rhinestones, clear sequins and some bakers twine finish off the card.  I love how this design turned out, and it's one of my favorite color combos too! 

  • Check out all the Edge'ables Only Words metal dies on the website HERE. 
  • "Like" our Facebook Page to keep up to date on all the NEW products being released.

 
Hope you have a "special day"

Supplies:
Crafter's Companion Edge'ables - On Your Special Day die
Crafter's Companion Bebunni Floral Collection Butterfly & Bee die set
Crafter's Companion Sentimentals - Sentimentals stamp set
White Embossing Powder
Microfine Cool Highlights Glitter
Clear Sequins
Black Rhinestones
Bakers Twine
Foam Adhesive

Die-cutting/embossing Machine
Heat Embossing Gun
Double Sided Adhesive Tape 
White and Colored Cardstock

Monday, May 11, 2015

On your special day

Today is the day! Sara Davies from Crafter's Companion is on HSN!!! The schedule is at the bottom of my blog post.

I designed this star box using Crafter's Companion The Big Score Board. It's one of the projects I created for the HSN show.


I love how this turned out! By using The Big Score, I was able to easily make this box nice and tall. I used a sheet from the Elegance Card Pack. This great quality cardstock is nice and thick...perfect for making sturdy and professional looking projects. It's white on the back side, which makes for PERFECT cards as well.
 

The bottom of the box is lined with a piece of black cardstock. I'm not sure if you can see in the picture, but I added 2 eyelets at the top to make attaching a bow and tag super easy.


I topped it with a sentiment stamped and heat embossed from Vintage Floral Collection EZMount Stamp Set - Sentimentals on a black star die-cut. 


I also added little die-cut stars covered with gold glitter. 


Check out other great projects that the US Design Team make for the HSN Show 24-Hour Craft Event over on Facebook.

Here's the HSN Schedule.
https://scontent-2.22773.fna.fbcdn.net/hphotos-xfp1/v/t1.0-9/15595_474920562664260_1587163155639327961_n.jpg?oh=99101dc37f79682c76612b48edd72f1f&oe=55D2B5DD

Thanks for stopping by today. Have fun crafting!


Supplies:
The Big Score Board
Elegance Card Pack
Vintage Floral Collection EZMount Stamp Set - Sentimentals
Die'sire Essentials Dies - Stars
Black Cardstock
VersaMark Ink Pad
White Embossing Powder
Gold Glitter
Ribbon and Trims
White Eyelets and Eyelet Setter Tool
Foam Adhesive
Liquid Adhesive
Die-cutting/Embossing Machine
Heat Embossing Tool

Friday, March 6, 2015

NEW Crafter's Companion Mediterranean Window Die

Hi! Today Crafter's Companion USA is releasing a NEW Die'sire Spring/Summer Die Collection.  Just wait till you see all these wonderful  dies!

Today I'm sharing the new Mediterranean Window Die. It comes with 2 dies - the window and the flower box. I used both on my card, but you can create with them individually.


I reeeeealllly love how this turned out! Best of all - YOU can make quick. The receiver of this card will think you spent hours on it! 

The window is die-cut and embossed. I adhered a panel of vellum behind the window only (not the shutters). Before I attached the window with foam tape to the blue cardstock panel, I adhered a die-cut heart flat down on the blue cardstock. I just held the window over where I wanted it to go to eyeball where to put the heart.


For the flower box, I die-cut the piece 2 times. On the first one I sponged green and red inks to shade the flowers. Then I colored the flower centers with a white gel pen. Then I added crystal glitter on all the flowers. For the 2nd die-cut piece, I cut off all the flowers and layered it on top of the first piece with foam tape. Then the entire piece is adhered to the bottom of the window. 

The sentiment is stamped on kraft cardstock, then cut down to make into 2 pieces. Both pieces are adhered flat. The larger heart is popped up with foam tape. The 2 tiny hearts are glued flat. That's pretty much it. You can change up the colors, use stars or flowers instead of hearts, or any other fun ideas you have. I can't wait to make some Halloween and Christmas themed "window" cards! 

Check out all the NEW Spring/Summer dies on the Crafter's Companion USA website HERE.

Check out what the Education Design Team has created to inspire you on the Blog and on Facebook.

Enjoy your day!


Supplies:
Die'sire Classique Dies - Mediterranean Window
Bebunni Floral Collection Dies - Hearts
Vintage Florals Collection Sentimentals - Phrases stamp set
Kraft Cardstock
White Cardstock
Vellum
Colored Cardstocks
Memento Tuxedo Black Ink
Distress Inks Barn Door and Peeled Paint
Crystal Glitter
White Gel Pen
Sanding Block
Dimensional Foam Adhesive
Diecut/embossing machine

Tuesday, December 16, 2014

Candy Cane Stripes

This is one of my favorite card designs!


The bold red "candy cane" panel was soooo easy to make! I created it using my eBrush and 1 Spectrum Noir Marker. I've got a tutorial on how to create Candy Cane Stripes over on the Spectrum Noir Blog HERE.  I'd love for you to pop on over and check it out.

And check out the cool chalkboard effect! The stamp is from Crafter's Companion Vintage Christmas Collection Sentimentals Friends and Family Set. The chalkboard cardstock is diecut & embossed from Die'sire Rectangles Die Set. The green label behind it was die-cut and embossed from green cardstock using the Die'sire Scalloped Tag Die set.


Have a Merry Day!


Other Supplies Used:
Neenah White, A Muse Studio Grass Green and Tiny Dots Black, DCWV Chalkboard CS, 1/2" Mask Tape, lime green rhinestones, silver stretch cording, red mini clothespin, sanding block, white pigment ink, white embossing powder, anti-static pouch, mini jingle bells, dimensional foam tape, heat embossing tool, die-cutting/embossing machine

Sunday, December 14, 2014

A Merry Little Christmas - Card and Tutorial

YES...you STILL have time to make Christmas cards...but you better hurry! If I can make a card in one evening...ANYONE can! LOL

Here's what I whipped up last  night with a bunch of my Crafter's Companion and Spectrum Noir Goodies...


(Supplies listed at end of blog post)

Instructions:

Step 1: Die-cut Scenic Pines from textured white c
ardstock.

Step 2: Create a mask for air-brushing by die-cutting another Scenic Pines from scrap cardstock. Trim away trees.

Step 3: Position mask and secure with repositionable tape. Airbrush trees with JG6 marker -spraying smaller trees a little darker than bigger trees.

Step 4: Remove mask carefully, to prevent tearing the paper.

Step 5: Using BG6 marker, color tree trunks and small areas where larger trees overlap the smaller trees. This will create depth.

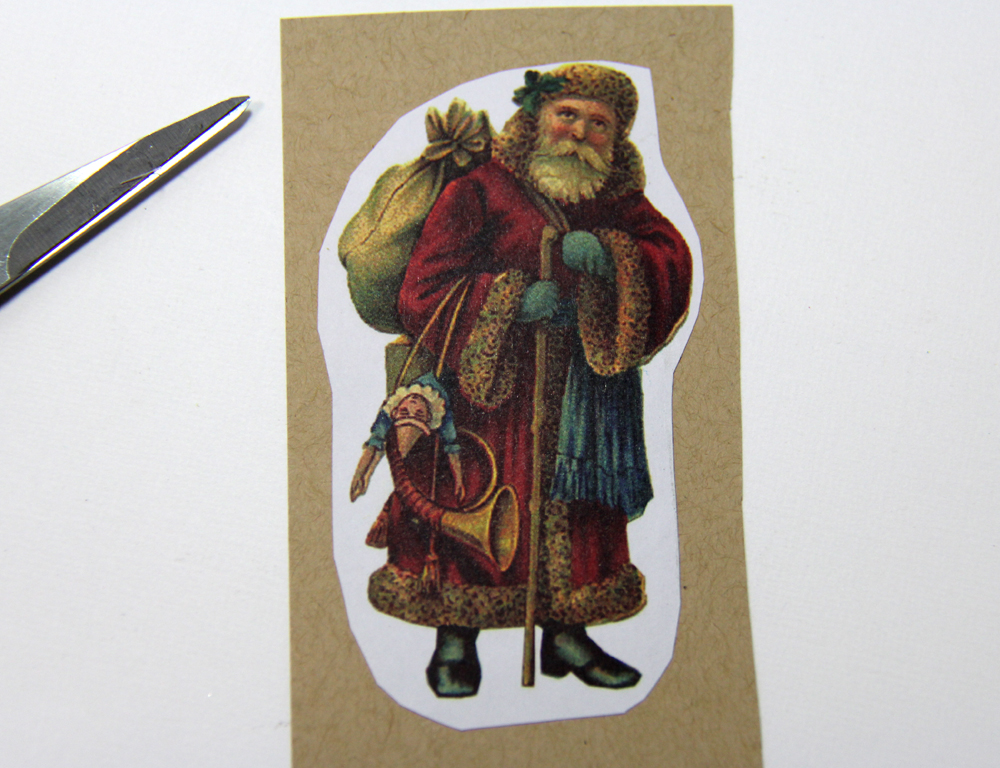
Step 6: Adhere Santa image to scrap piece of Kraft cardstock. This will create a sturdy piece to trim out and attach to card. Closely trim image with detail scissors. NOTE: The Santa image is from the paper pack that is included with the Crafter’s Companion Inspiration Magazine Issue 5 - Christmas Edition.

Step 7: Lightly sponge edges with Walnut Stain Distress Ink.

Step 8: Emboss 5” x 3 ¾” Kraft cardstock panel with snowflakes embossing folder. Sponge on Old Paper Distress ink with ink blending tool. Also, sponge this ink color around the edges of the Scenic Pines die-cut piece.

Step 9: Sponge on Aged Mahogany Distress ink with ink blending tool.

Step 10: Sponge on Walnut Stain Distress ink with ink blend tool.

Step 11: Apply Clear Rock Candy Distress Stickles to all 3 pieces. Let dry completely.

Step 12: Stamp sentiment with VersaMark on red cardstock. Apply embossing powder and heat emboss. Trim with scissors to create a banner.

Step 13: Apply Distress Stain around outer edges of front of 5 ½” x 4 ¼” Kraft notecard. Let dry.

Step 14: Assemble Card as follows: Adhere snowflake panel to 5 ¼” x 4” red cardstock panel. Staple sentiment to panel. Adhere tree border. Attach entire panel to notecard with dimensional foam tape. Attach Santa to card with dimensional foam tape.

IF by chance you don't get all those handcrafted cards done in time for Christmas, just change up the sentiment. It could be a "thank you" or "thinking of you" card. Or just leave off the sentiment and write a letter inside. Remember the days of writing letters? Yeah...text messages just don't say it like a handmade card with your very own handwriting. Just sayin'


Have a great day!


Supplies:
Crafter's Companion Vintage Christmas Collection EZ Mount Stamp Set - Sentimentals Home For Christmas
Crafter’s Companion Inspiration Magazine Issue 5 - Christmas Edition - Paper Pack and Vintage Christmas Snowflake Flutter Embossing Folder
Die'sire Classiques Christmas Scenic Pines Die
Shimmering Cardstock Candy Red
Kraft Cardstock
Textured White Cardstock
Spectrum Noir Markers JG6, BG6
Craftwell eBrush
VersaMark Ink
Distress Inks - Aged Mahogany, Walnut Stain and Old Paper
Ink Blending Tools
Distress Stickles Clear Rock Candy
Ranger Liquid Platinum Embossing Powder
Distress Stain Picket Fence
Mini Stapler
Dimensional Foam Adhesive
Washi Tape or Easy Release Tape
Heat Embossing Tool
Detail Scissors
Die Cutting/Embossing Machine