Hello friends. It's been a while since I blogged or even really crafted. I got a horrible flu bug the first day of CHA and I've been down ever since. I'm finally today feeling human enough to get a quick project done and posted.
It's time again for another month in my desktop calendar. I always have fun coming up with designs that will fit in the small space I have to create in. For this month I used a really fun Mask & Stencil Set along with 2 stamp sets by Leonie Pujol for Crafter's Companion.
I took the stencils and placed it down on the page. Then I blended some Picked Raspberry and Wilted Violet Distress Inks over the mask. Next I stamped the little images with black ink. Once done stamping, I removed the stencil mask to reveal the most perfect "Love" sentiment. I love how this turned out!
I added a few bright pink rhinestones and a piece of washi tape in the corner for added texture and interest. That's it! These stencils and stamp really are a load of fun to create with. Check out all the different stencil and stamp sets over at Crafter's Companion HERE.
Get more project inspiration using Crafter's Companion products and stay up with the latest news at:
Facebook - Crafter's Companion USA
Instagram - Crafter's Companion USA
Pinterest - Crafter's Companion USA
Websites - Crafter's Companion USA
Have a wonderful day!
Showing posts with label Valentine. Show all posts
Saturday, February 4, 2017
Thursday, February 11, 2016
My main squeeze!
Hello Friends! Another day...another fun project to share. This card can be sent for any happy occasion. It's sure to give a little chuckle and a smile.
The stamp is from Eat Cake Graphics. It's called Main Squeeze. Isn't it a HOOT?!!!
I colored with Spectrum Noir Markers:
To create the shaded "frame" around the image, I masked off the area and lightly blended with distress ink. Super simple and very effective! The hearts are die cut and colored over with Clear Sparkle Pen, then covered with Glossy Accents.
The sentiment stamp is also from Eat Cake Graphics. It's called In Her Handbag. The full sentiment actually says "In her handbag was chocolate. She was happy." I just inked up and stamped the part I wanted. That's a great way to get more miles from your sentiment stamps!
I also wanted to share a great "Coloring Curly Hair Tutorial" by Dilyana over on the Spectrum Noir Blog. Super simple I tell ya!
As always...thanks so much for stopping by! I hope I've inspired you to pull out your supplies and get a little creative today.

Supplies:
Eat Cake Graphics Stamps
Spectrum Noir Markers
Spectrum Noir Clear Sparkle Pens
White Cardstock
Red Cardstock
My Favorite Things Dies
Die-cutting Machine
Memento Tuxedo Black Dye Ink
Versafine Onyx Black Ink
Ranger Distress Ink
Blending Foam
Masking Tape
Glossy Accents
Dimensional Foam Tape
Adhesive Tape
The stamp is from Eat Cake Graphics. It's called Main Squeeze. Isn't it a HOOT?!!!
I colored with Spectrum Noir Markers:
- Hair - EB3, EB8, GB8
- Skin - FS1, FS2, FS3, TN2, CR3
- Mouth - FS7
- Dress/Shoes - BT2, BT4, BT5, DR2, DR5
- Pants - EB1, EB2, GB8
- Shirt/Shoes - GG2, GG3, Blender
- Shading - IG1, HB1, Blender
To create the shaded "frame" around the image, I masked off the area and lightly blended with distress ink. Super simple and very effective! The hearts are die cut and colored over with Clear Sparkle Pen, then covered with Glossy Accents.
The sentiment stamp is also from Eat Cake Graphics. It's called In Her Handbag. The full sentiment actually says "In her handbag was chocolate. She was happy." I just inked up and stamped the part I wanted. That's a great way to get more miles from your sentiment stamps!
I also wanted to share a great "Coloring Curly Hair Tutorial" by Dilyana over on the Spectrum Noir Blog. Super simple I tell ya!
As always...thanks so much for stopping by! I hope I've inspired you to pull out your supplies and get a little creative today.
Supplies:
Eat Cake Graphics Stamps
Spectrum Noir Markers
Spectrum Noir Clear Sparkle Pens
White Cardstock
Red Cardstock
My Favorite Things Dies
Die-cutting Machine
Memento Tuxedo Black Dye Ink
Versafine Onyx Black Ink
Ranger Distress Ink
Blending Foam
Masking Tape
Glossy Accents
Dimensional Foam Tape
Adhesive Tape
Wednesday, February 10, 2016
Fresh Brewed Designs Challenge
Hello crafty peeps! With Valentine's Day just around the corner..let's have a little fun with some hearts.
Today starts a new challenge over at Fresh Brewed Designs - Hearts.
Easy enough...right :) Get all the details on the Challenge Blog.
Here's my card design...
I used the Ladybug Love Digi image along with a sentiment from the Digi Sentiment Set. All the coloring is done with Spectrum Noir Markers as follows:
I printed the ladybug a few extra times so I could trim out the wings and pop them up on the card. After coloring, I added black glitter to the hearts on the wings. To make the wings and red hearts glossy, I colored over with VersaMark Marker and heat set with clear embossing powder.
The card measures 4.25" x 4.25" and the image panel is popped up on foam adhesive. That's all there is too it!
Need more inspiration? Go check out Fresh Brewed Designs Challenge Blog and Facebook Page for loads of samples and ideas! Make sure to share what you have been creating too!
Need help coloring with your Spectrum Noir Markers? Check out all the fabulous tutorials, tips, tricks and samples over on the Spectrum Noir Blog.

Have a fun day!
Supplies
Fresh Brewed Designs Digi Images
Spectrum Noir Markers
Neenah white cardstock
My Favorite Things Stitched Scalloped Boarder Die
A Muse Studio designer cardstock
VersaMark Marker
Clear Embossing Powder
Glue Pen
Black Glitter
Heat Embossing Gun
Die-cutting Machine
Dimensional Foam Adhesive
Today starts a new challenge over at Fresh Brewed Designs - Hearts.
Easy enough...right :) Get all the details on the Challenge Blog.
Here's my card design...
- Reds - DR2, CR5, PP3
- Blacks - IG10, IG8, IG6, IG4, IG2
- Ground shading - IG1, IG2, Blender
- Shading around image - GB1, IG1, Blender
- Wing Hearts - True Black
I printed the ladybug a few extra times so I could trim out the wings and pop them up on the card. After coloring, I added black glitter to the hearts on the wings. To make the wings and red hearts glossy, I colored over with VersaMark Marker and heat set with clear embossing powder.
The card measures 4.25" x 4.25" and the image panel is popped up on foam adhesive. That's all there is too it!
Need more inspiration? Go check out Fresh Brewed Designs Challenge Blog and Facebook Page for loads of samples and ideas! Make sure to share what you have been creating too!
Need help coloring with your Spectrum Noir Markers? Check out all the fabulous tutorials, tips, tricks and samples over on the Spectrum Noir Blog.
Have a fun day!
Fresh Brewed Designs Digi Images
Spectrum Noir Markers
Neenah white cardstock
My Favorite Things Stitched Scalloped Boarder Die
A Muse Studio designer cardstock
VersaMark Marker
Clear Embossing Powder
Glue Pen
Black Glitter
Heat Embossing Gun
Die-cutting Machine
Dimensional Foam Adhesive
Friday, February 5, 2016
Spectrum Noir February Challenge
Grab your Spectrum Noir Coloring Tools...because it's Challenge Time!
Colors of Love: Use Pinks and/or Reds
The challenge is to use pink and/or red colors on your project - but it doesn't have to be a valentine theme. See details, get inspiration from our design team, and enter the challenge HERE.
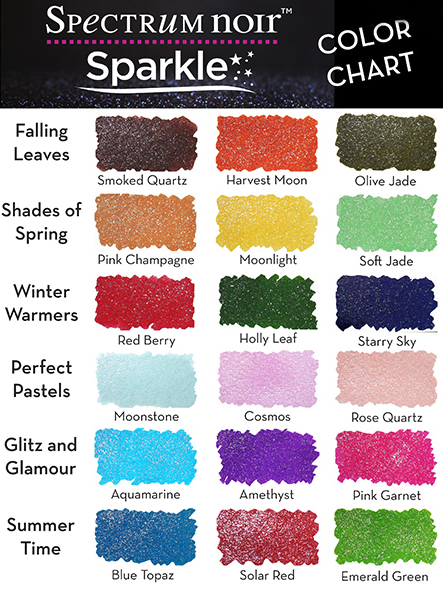
I stamped and heat embossed this fun image on Spectrum Noir Ultra Smooth White Cardstock. Then I colored it with Spectrum Noir Sparkle Pens - Cosmos, Red Berry, Pink Garnet and Clear.
OH EM GEE!!! LOOK at the SHIMMER from those pens!!! THUD! These pens are the best EVER!
Check out all the other fantastic Sparkle Pen colors over on the Crafter's Companion USA website.
You have all month to play along with our challenge. I hope you join us! As always...prizes are involved. Just sayin' ;)

Happy coloring,
Supplies:
Spectrum Noir Sparkle Pens: Cosmos, Red Berry, Pink Garnet and Clear
Crafter's Companion Shimmering Cardstock - Candy Red
Spectrum Noir Ultra Smooth Premium White Cardstock
Stamp from Outline Images Rubber Stamps.
Designer Cardstock
Red Pigment Ink
Clear Embossing Powder
Heat Embossing Tool
Scalloped Border Punch
Red Rhinestones
Colors of Love: Use Pinks and/or Reds
The challenge is to use pink and/or red colors on your project - but it doesn't have to be a valentine theme. See details, get inspiration from our design team, and enter the challenge HERE.
I stamped and heat embossed this fun image on Spectrum Noir Ultra Smooth White Cardstock. Then I colored it with Spectrum Noir Sparkle Pens - Cosmos, Red Berry, Pink Garnet and Clear.
OH EM GEE!!! LOOK at the SHIMMER from those pens!!! THUD! These pens are the best EVER!
Check out all the other fantastic Sparkle Pen colors over on the Crafter's Companion USA website.
You have all month to play along with our challenge. I hope you join us! As always...prizes are involved. Just sayin' ;)
Happy coloring,
Supplies:
Spectrum Noir Sparkle Pens: Cosmos, Red Berry, Pink Garnet and Clear
Crafter's Companion Shimmering Cardstock - Candy Red
Spectrum Noir Ultra Smooth Premium White Cardstock
Stamp from Outline Images Rubber Stamps.
Designer Cardstock
Red Pigment Ink
Clear Embossing Powder
Heat Embossing Tool
Scalloped Border Punch
Red Rhinestones
Wednesday, February 3, 2016
2016 Calendar
It's Calendar Time! Better late than never, right? LOL
So here's my new 2016 Calendar Project. Let's start with the cover...
I absolutely LOVE how this design came together! So much that I am going to use it for making a card! (stay tuned!)
I used Crafter's Companion Die'sire Classiques Only Words 1" Contemporary Numbers & Punctuation to die cut the year. As you can see, I used the negative of the die cut numbers, preserving the negative 0 and 6 centers and mounted to a white cardstock panel to create the year. It's all layered on top of the Die'sire - Nouveau Stamping Frame die.
The flowers are die cut from Bebunni Floral - Daisy die set. The sentiment stamp is from Sentimentals - Memories are Made stamp set.
Next up is January...
I know...it's done and gone. But you still wanna see it...right?

I decided on a fun little winter scene for the January page. The snowflake stamp is from a Bebunni Christmas Stamp Set - Rudolph. To create the cluster of houses and trees, I used the Nordic Christmas Stamp Set - Santa's Delivery. I stamped and colored, then trimmed out and cut apart and layered. I added crystal glitter for a bit of "snow sparkle" - applied with a glue pen.
Spectrum Noir Markers used for coloring:
BG1, BG3, CT4, CG2, DG2, DG3, DG4, GB8, GB9, GB10, DR5, DR6, DR7, Blender
And here's February...

The Sheena Xmas - Heartfelt Wishes stamp set is great for more than just Christmas! I love using my holiday stamp sets for more than the holiday they were intended for. No reason to let 'em sit around collecting dust all year...right? ;) LOL
I used 1 sentiment stamp from Sentimentals - Love is all you need stamp set, stamping part of it in each heart.
Spectrum Noir Markers used for coloring:
Make sure to check back later this month for my March page.

Thanks so much for stopping by!
Cover/Base Supplies:
Die'sire Decorative Dies - Nouveau Stamping Frame
Die'sire Classiques Only Words - 1" Contemporary Numbers & Punctuation
Bebunni Floral Metal Dies - Daisy
Sentimentals EZMount Stamp Set - Memories are made
Spectrum Noir Ultra Smooth Premium White Cardstock
Colored Cardstocks
Memento Tuxedo Black Ink
Die-cutting Machine
Green Rhinestones
Dimensional Foam Adhesive
Binding Machine
January Page Supplies:
Nordic Christmas Stamp Set - Santa's Delivery
Bebunni Christmas Stamp Set - Rudolph
Spectrum Noir Ultra Smooth Premium White Cardstock
Spectrum Noir Markers
Memento Tuxedo Black Ink
Crystal Glitter
Dimensional Foam Adhesive
Glue Pen
February Page Supplies:
Sheena Xmas Stamp Set - Heartfelt Wishes
Sentimentals Stamp Set - Love is all you need
Spectrum Noir Ultra Smooth Premium White Cardstock
Spectrum Noir Markers
Memento Tuxedo Black Ink
Memento Gray Flannel Ink
Clear Sequins
Crystal Rhinestones
Dimensional Foam Adhesive
Liquid Adhesive
So here's my new 2016 Calendar Project. Let's start with the cover...
I absolutely LOVE how this design came together! So much that I am going to use it for making a card! (stay tuned!)
I used Crafter's Companion Die'sire Classiques Only Words 1" Contemporary Numbers & Punctuation to die cut the year. As you can see, I used the negative of the die cut numbers, preserving the negative 0 and 6 centers and mounted to a white cardstock panel to create the year. It's all layered on top of the Die'sire - Nouveau Stamping Frame die.
The flowers are die cut from Bebunni Floral - Daisy die set. The sentiment stamp is from Sentimentals - Memories are Made stamp set.
Next up is January...
I know...it's done and gone. But you still wanna see it...right?
I decided on a fun little winter scene for the January page. The snowflake stamp is from a Bebunni Christmas Stamp Set - Rudolph. To create the cluster of houses and trees, I used the Nordic Christmas Stamp Set - Santa's Delivery. I stamped and colored, then trimmed out and cut apart and layered. I added crystal glitter for a bit of "snow sparkle" - applied with a glue pen.
Spectrum Noir Markers used for coloring:
BG1, BG3, CT4, CG2, DG2, DG3, DG4, GB8, GB9, GB10, DR5, DR6, DR7, Blender
And here's February...
The Sheena Xmas - Heartfelt Wishes stamp set is great for more than just Christmas! I love using my holiday stamp sets for more than the holiday they were intended for. No reason to let 'em sit around collecting dust all year...right? ;) LOL
I used 1 sentiment stamp from Sentimentals - Love is all you need stamp set, stamping part of it in each heart.
Spectrum Noir Markers used for coloring:
- Pink Heart - PP1, PP2
- Red Heart - CR5, DR3, DR5
Make sure to check back later this month for my March page.
Thanks so much for stopping by!
Cover/Base Supplies:
Die'sire Decorative Dies - Nouveau Stamping Frame
Die'sire Classiques Only Words - 1" Contemporary Numbers & Punctuation
Bebunni Floral Metal Dies - Daisy
Sentimentals EZMount Stamp Set - Memories are made
Spectrum Noir Ultra Smooth Premium White Cardstock
Colored Cardstocks
Memento Tuxedo Black Ink
Die-cutting Machine
Green Rhinestones
Dimensional Foam Adhesive
Binding Machine
January Page Supplies:
Nordic Christmas Stamp Set - Santa's Delivery
Bebunni Christmas Stamp Set - Rudolph
Spectrum Noir Ultra Smooth Premium White Cardstock
Spectrum Noir Markers
Memento Tuxedo Black Ink
Crystal Glitter
Dimensional Foam Adhesive
Glue Pen
February Page Supplies:
Sheena Xmas Stamp Set - Heartfelt Wishes
Sentimentals Stamp Set - Love is all you need
Spectrum Noir Ultra Smooth Premium White Cardstock
Spectrum Noir Markers
Memento Tuxedo Black Ink
Memento Gray Flannel Ink
Clear Sequins
Crystal Rhinestones
Dimensional Foam Adhesive
Liquid Adhesive
Labels:
Calendar,
CAS,
Crafter's Companion,
die,
DIY,
gift ideas,
Love,
Spectrum Noir,
Valentine,
winter
2
Comments
Sunday, January 31, 2016
Butterfly Pops
Hello everyone! It's time to get those Valentine's goodies created. These Butterfly Pops are great for a quick and easy way to pass out those Valentines!
Easy for the kids to help and put together assembly-line style!
While thinking about my design, I kept in mind that whoever received these treats are going to head straight for the candy. So, keeping it quick and simple was a must.
Here's how:
TIPS: To personalize each treat, write on the back of each sentiment tag before adhering to the stick. You can also use fun pencils in place of the suckers!
Wouldn't these make a great party favor?! Change up the colors and sentiments for variety.
Happy crafting!
Supplies:
Crafter's Companion Die'sire Decorative Dies - Butterflies
Crafter's Companion Shimmering Cardstock - White Pearl and Pink Pearl
Crafter's Companion Textures Artist Collection - Words of Wonder - Set 2
Red Pigment Ink
Red Glitter Embossing Powder
Decorative Scissors
Sheer Black Ribbon
Red Rhinestone Stickers
Heat Embossing Gun
Die-cutting Machine
Red Suckers
Glue Dots
While thinking about my design, I kept in mind that whoever received these treats are going to head straight for the candy. So, keeping it quick and simple was a must.
Here's how:
- Die-cut Butterflies from White Pearl Shimmering Cardstock.
- Trim strips of Pink Pearl Shimmering Cardstock. Stamp LOVE sentiment with red pigment ink on pink cardstock strips, then heat emboss with red glitter embossing powder. Trim ends with decorative scissors.
- Place sucker on top of butterfly. Thread ribbon from behind the butterfly, through the wing holes, and bring round the front of sucker. Secure by tying a knot and/or bow.
- Add rhinestone sticker on top of bow.
- Adhere sentiment tag to stick.
TIPS: To personalize each treat, write on the back of each sentiment tag before adhering to the stick. You can also use fun pencils in place of the suckers!
Wouldn't these make a great party favor?! Change up the colors and sentiments for variety.
Happy crafting!
Supplies:
Crafter's Companion Die'sire Decorative Dies - Butterflies
Crafter's Companion Shimmering Cardstock - White Pearl and Pink Pearl
Crafter's Companion Textures Artist Collection - Words of Wonder - Set 2
Red Pigment Ink
Red Glitter Embossing Powder
Decorative Scissors
Sheer Black Ribbon
Red Rhinestone Stickers
Heat Embossing Gun
Die-cutting Machine
Red Suckers
Glue Dots
Monday, February 9, 2015
Love is in the air
Hi guys! It's almost Valentine's Day...so how about a little V-Day House-Mouse love :)
Our challenge theme this time around at the House-Mouse & Friends Monday Challenge Blog is Love is in the air. Get all the challenge and prize details on the blog HERE.
I used a House-Mouse stamp called Monica Romances. Isn't she so cute :) After I stamped the sentiment in red, I did a little hand doodling
around it with a fine tip black marker. All the coloring is done with
pencils. I stamped pink mouse prints in the lower right corner. The heart is diecut and popped up with foam tape.
Another stamp set I used...which I LOVE...is a Lizzie Anne Designs stamp set from Simon Says Stamps called Chalkboard Love.
The big hearts stamped in light pink on the background and the scroll banner sentiment are from that set.
I hope you have time play the challenge with us.
Happy Stamping!
Saturday, January 17, 2015
Sneak Peek Time
Hello everyone. Today I get to give a sneak peek of the NEW Crafter's Companion Sheena Distressed Grid Decorative Stencil that will be coming soon!
This new stencil is fantastic! It's 7" x 7" and gives you so much room to work with. I can't wait for you to see all the other new stencils that are being released. THUD!

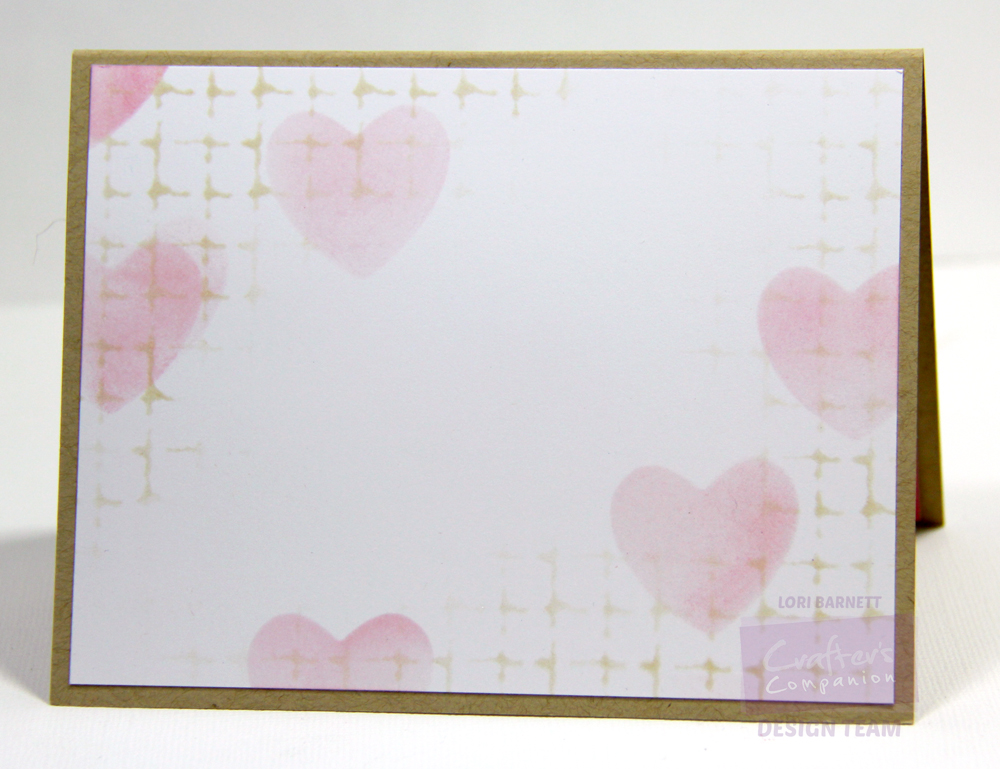
To make the design on my card, I placed the stencil over the white cardstock panel and sponged with Antique Linen Distress Ink. Next, I die-cut a heart and placed the negative piece over the white cardstock panel and sponged with Spun Sugar, Worn Lipstick and Antique Linen Distress Inks. The sentiment is stamped with Memento Luxe Espresso Truffle ink and heat embossed.
I also die-cut a heart from kraft cardstock, sponged with Antique Linen Distress Ink, and topped with ribbons, twine and button.
For the inside of the card, I die-cut the heart and used the negative piece to sponge. Then I used the new stencil and sponged distress ink over the top.
You'll find more sneak peeks the new stencils on our Facebook Page. Make sure to "Like" the page, so you can keep up with all the latest news.
Thanks for stoppin' by!
Supplies:
Crafter's Companion Sheena Stencil - Distress Grid
Crafter's Companion Sentimentals - Memories are Made Stamp Set
Crafter's Companion Die'sire Essentials - Hearts
Distress Inks - Spun Sugar, Worn Lipstick, Antique Linen
Memento Luxe Ink - Espresso Truffle
Crafter's Companion Kraft Cardstock
White and other misc.colored cardstocks
Clear Embossing Powder
Ink Blending Foams
Ribbons, Twine, Button
Double Sided Foam Adhesive
This new stencil is fantastic! It's 7" x 7" and gives you so much room to work with. I can't wait for you to see all the other new stencils that are being released. THUD!

To make the design on my card, I placed the stencil over the white cardstock panel and sponged with Antique Linen Distress Ink. Next, I die-cut a heart and placed the negative piece over the white cardstock panel and sponged with Spun Sugar, Worn Lipstick and Antique Linen Distress Inks. The sentiment is stamped with Memento Luxe Espresso Truffle ink and heat embossed.
I also die-cut a heart from kraft cardstock, sponged with Antique Linen Distress Ink, and topped with ribbons, twine and button.
For the inside of the card, I die-cut the heart and used the negative piece to sponge. Then I used the new stencil and sponged distress ink over the top.
You'll find more sneak peeks the new stencils on our Facebook Page. Make sure to "Like" the page, so you can keep up with all the latest news.
Thanks for stoppin' by!
Supplies:
Crafter's Companion Sheena Stencil - Distress Grid
Crafter's Companion Sentimentals - Memories are Made Stamp Set
Crafter's Companion Die'sire Essentials - Hearts
Distress Inks - Spun Sugar, Worn Lipstick, Antique Linen
Memento Luxe Ink - Espresso Truffle
Crafter's Companion Kraft Cardstock
White and other misc.colored cardstocks
Clear Embossing Powder
Ink Blending Foams
Ribbons, Twine, Button
Double Sided Foam Adhesive
Monday, February 10, 2014
NEW Digital Stamps and BLOG HOP!
OH MY!!! I'VE CAUGHT A BUG!!!
Don't you worry, you'll want to catch it too!
It's time to check out Fresh Brewed Designs New Digital Stamps for February.
There are 5 new images being released today, so get ready to HOP and see them all!
If you are arriving here from the Freshly Brewed Challenges blog, then you are right on track!
I was having so much fun with this cutie bug I made 3 cards! The sentiments are from a digi stamp set called Love Sentiment Set. GREAT SET!!
I did all my coloring with Copic markers. And yes...all the cards have glitter on them! This next one I changed the layout - plus added ribbon and 2 rhinestones.

This last one I used a different sentiment from the Love Sentiment Digi set. Doesn't Cutie Chef Bug look great colored in reds?! ;)
That's it for me today...and it's time for YOU to BUZZ on over to my
friend Linda's blog. She has an adorable project to share with everyone!
Be sure to hop through in full for a chance to win a free digi from this release!!!
This hop starts today, February 10th, and ends on February 12, 11:59 PM EST.
Hop order:
Lori <<<< You are HERE>>>>

Thursday, February 6, 2014
From me to you
Have you seen the Bebunni Collection from Crafter's Companion? Check it out HERE.
Bebunni is a cuddly, super cute rabbit with very very large ears and a very very large heart! Bebunni even has a Facebook Page!
I'm using stamps from the NEW Bebunni Love Collection - Love You set stamped on Ultra Smooth Premium White Cardstock.
Sooooo CUTE! 
I colored everything with Spectrum Noir markers - then added a few accents with a white gel pen.
Get more inspiration for Bebunni and all the other Crafter's Companion stamps on Pinterest.
Fom me to you!

Spectrum Noir Markers:
BT1, BT2, BT4, CR2, CR3, CR5, CR6, CR8, TN1, TN2, TN3, IG1, IG2, Blender
Bebunni is a cuddly, super cute rabbit with very very large ears and a very very large heart! Bebunni even has a Facebook Page!
I'm using stamps from the NEW Bebunni Love Collection - Love You set stamped on Ultra Smooth Premium White Cardstock.
I colored everything with Spectrum Noir markers - then added a few accents with a white gel pen.
I used Splitcoaststampers Card Sketches - SC473 for my design inspiration. I love sketches!
Challenges are a great way to get your creative juices flowing. We have a monthly challenge going on right now over on the Crafter's Companion Challenge Blog. This month is a CAS challenge - Clean and Simple. Create a project you consider to be in the clean and simple style. Get all the challenge and prize details on the blog HERE. The above sketch is a great layout for making a CAS card! Get more inspiration for Bebunni and all the other Crafter's Companion stamps on Pinterest.
Fom me to you!
Spectrum Noir Markers:
BT1, BT2, BT4, CR2, CR3, CR5, CR6, CR8, TN1, TN2, TN3, IG1, IG2, Blender
Subscribe to:
Posts (Atom)