I used 2 stamps sets from Crafter's Companion that I just recently added to my collection. Fairyopolis Summer - which has the most beautiful images that I just love! And Sentimentals Memories Are Made - the sentiments and quotes on this set are amazing! Both of these sets will be loved...BUNCHES!

 Yeah...you WILL want these!!!

I painted over the top of the butterfly, dress, wings and hair with Sparkle Sheer Shimmer Spritz (soon to be released). The final touch - a hint of crystal glitter. Beautiful!

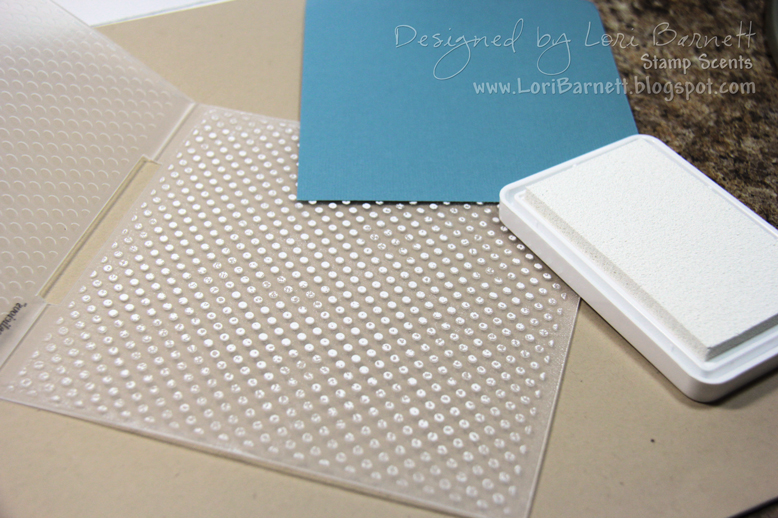
Using my Crafter's Companion Petite Dot 6x6 Embossalicious Embossing Folder and white pigment ink, I "debossed" the blue cardstock panel. Soooooo cool! And...since the embossed dots are "down" into the cardstock...the vellum piece lays down flat! Perfect!
Stamping on the inside of the card too. LOVE!

Are you ready to have some fun with your embossing folders? Of course ya are!
Simple Embossing Folder Technique
This technique will "press down" the "inked dots" into the paper. This is also called debossing. For my card, I used the Crafter's Companion Petite Dot 6 x 6 folder and white pigment ink
Gently ink the raised surface of your embossing folder. Don't push/squish down hard with the ink pad! The goal is to get ink on the raised dots. Ink it up like a stamp. tap tap tap tap tap tap the ink pad to the dots --- OR --- you can gently swipe the ink pad across the top of the dots. Test the ink you want to use on a small sample to make sure it will work. You want to use an ink that says wet long enough on the folder to do the technique. If ink gets somewhere that you don't want it, simply clean off before placing your paper down.
Place cardstock down and close the folder. (I got ink on the back of my cardstock piece -- but it's ok because it's the back side)

Run through die cut machine following manufacture instructions for embossing folders.

Any ink left on the embossing folder cleans up easily with a baby wipe.
This technique works great for tone on tone!
Now go ink up your embossing folders and have some embossalicious fun!

See you soon!

Some of the products used on my card:
Crafter's Companion Fairyopolis - Summer
Crafter's Companion Sentimentals Memories Are Made
Crafter's Companion Petite Dot 6x6 Embossalicious Embossing Folder
Spectrum Noir Professional Colored Pencils (soon to be released)
Sheer Shimnmer Spritz Sparkle
Radiant Neon Pigment Ink Electric Blue (soon to be released at Crafter's Companion)
StazOn Midi Ink Cloudy Sky (soon to be released at Crafter's Companion)
Hero Arts Unicorn White Pigment Ink
Ranger Distress Ink Shabby Shutters and Wild Honey
Versamark Ink
Bazzill Cardstocks
1 comment:
Fabulous debossing use for a terrific look. Love the embossed fairy thats so very pretty! Beautiful work girlfriend.
Post a Comment